Wednesday, November 25, 2015

Be Thankful for All That Inspires
by Mary Ellen

Swiss chard is always the last thing from the garden that I prepare for the freezer because it stands up so well to frost that I can put off harvest for weeks and weeks and weeks. "If it weren't for the last minute, nothing would get done," said Rita Mae Brown. But with all things biological, timing is everything and when I finally made it out to the garden this is what I found:


Here is what is left of our garden's
gorgeous leafy "Bright Lights" chard.

We have a 6 ft. tall garden fence, but we also have a really healthy deer population. Oh well. I am pretty much over canning and freezing produce anyway.

The good thing about my garden discovery is that it took me past an old Blewit bed that I had made years ago. Sometimes I need a little inspiration when it comes to cooking. Homegrown, fresh harvested vegetables usually provide the spark needed to initiate some creativity in my kitchen. So when I spied a few late flushing Blewits on my way out of the garden, my spirits perked considerably.


Wood Blewit (Clitocybe nuda)
As with most cultivated fungi, there are quick and easy ways to plant and also more complex ways. And like most things in life, you usually get more the greater the effort. In our cultivation instructions for Blewit, we discuss two methods, both including layering lots of compost and lesser amounts of decomposed organic matter with spawn (the instructions are provided with orders of Blewit spawn, but also can be found on our website's Seasonal Planting Chart link under "Blewits in the Garden").

There are two things I really appreciate about Blewits. One is their lovely lilac color and fairly dense flesh. The second is their long fruiting period in the fall. The fall Blewit is Clitocybe nuda, formerly known as Lepista nuda. I don't know what the etyology of nuda is except that the earlier Blewits grown under warmer temperatures tend to have a fleshy color and appearance. Later Blewits tend to be a little more true blue. Recently, we have been cultivating another Blewit, also known as Blue Leg, whose scientific name is Clitocybe sordida. This Blewit looks very different than Clitocybe nuda and fruits quite a bit earlier, usually mid to late august. It lacks the bulbous stem and meaty cap, instead developing a thin stalk and knobby cap. It is a nice litter decomposer that can be grown later in the summer. We will be offering this species for the first time in 2016, so watch for it if you're interested in growing it!


Blue Leg or Clitocybe sordida

But for now, I have to share this delicious creation, because if you are a gardener like me, right now you probably have too much squash on hand. Here is a way to reduce your porch stash of squash by at least one!


The recipe below will help you clear a path to your kitchen door
(and fill some seats at your table)!

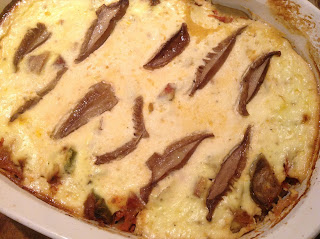
Inspired Blewit and Spaghetti Squash GratinThis layered gratin is a take-off on pasta alfredo, but better and certainly more healthful. The squash is the base layer, followed by a tomato layer and then topped with a ricotta custard decorated with thick slices of roasted Blewit. Consider purchasing whole milk ricotta for this dish for even richer flavor.

Gratin just out of the oven.

Preheat oven to 350°F. Wack the squash across the middle with a cleaver and scoop out the seeds.
Roast the Squash and Blewits: Place the halves cut side down on a greased cookie sheet and bake until tender, about 50-60 minutes. Meanwhile, stem the Blewits and thickly slice the caps. Brush them with olive oil and lay out on a cookie sheet and roast until they brown on the edges, about 20 minutes (you can use any mushroom, but it's a nice way to use Blewits if you only have a few). Set aside when done. When the squash is tender, let it cool a bit and scoop out its stringy flesh, separating it with a fork. Season with butter, salt, and pepper to taste.

Tomato Layer: All you need is a few cups of sauce to cover the squash once it is spread out on the bottom of the gratin pan. I used a homemade sauce with roasted vegetables, but you can use whatever sauce you like. A chunky sauce with texture works nicely.

Custard Layer:
1 c ricotta cheese
1 c milk
1/4 c grated Asiago or other hard cheese
2 eggs
1/4 heaping  tsp salt and pepper
Whisk all together

Assembly:
Butter a gratin pan (I used a 2 qt. casserole dish). Lay down a layer of squash, spoon the tomato sauce over it, and then pour the ricotta custard over the top. Place the Blewit slices in a decorative fashion on top, and bake at 350°F for 40-60 minutes. Cool 10 minutes before cutting into squares. Was it good? I ate a half pan in one night :-) Enjoy!


Layers of squash, tomato. cheesy custard and Blewit,
paired with a green salad. You'll be very thankful.


Tuesday, September 1, 2015

The Road Less Traveled: 
F&FP in Africa (Part 2)
by Laura

Oysters fruiting from small thin plastic bags filled with chopped cornstalk substrate
in Malawi, Africa. These particular bags contain high bacterial contamination.

The Tisange Association in Malawi, Africa have only been growing oyster mushrooms since March of 2015. They received their initial training from another group in Malawi called Chalera. Last year, a CNFA volunteer, Matthew Cleaver, trained them in the basic principles of oyster mushroom production, mostly covering different substrate treatment methods. Matthew and I are both volunteering this year, and met upon arrival at the airport in Lilongwe (Malawi’s capital).

The Chalera group dancing and singing with excitement.

One of the first things we did after settling in was visit the farm of the Chalera group. It was simply amazing! They were so happy to see Matt, they broke out into song and dance. I was told that they were singing about mushroom production. It was such a welcoming experience. Malawi is referred to as the warm heart of Africa, and I can see why! We only stayed a short while because our assignments were located elsewhere. Matt was to stay in the city working directly with the Natural Resource College (where some of the spawn is made), while I would travel 5 hours north to Mzuzu to meet the members of the Tisange Association.

The typical landscape in Mzuzu. Walls are placed around some residences and public places
for security reasons. Most of the landscape is being farmed in one way or another.

Meeting the group was peaceful. They too were welcoming (although not breaking out into song), but they were quiet toward me. I suppose they were just as curious about my knowledge in the field as I was about what concepts they had a strong grasp upon. I was traveling with a translator named Limbi. He is a local that speaks excellent English, as well as Chitumbuka (the local language).


Our first training day consisted of a lecture in the host’s home (which would also serve as our classroom each day), and then I asked them to walk me through their current process. We tried to split days up, half inside lecturing, and half outdoors doing hands on work. The group had become very discouraged by high contamination rates, and low mushroom production. I had to do my best to determine why they were experiencing such high contamination.

Corn stalks are chopped in preparation for pasteurization.
From left to right members: Love, Clement, Agery, and Khumbo.

The Tisange Group is using dried corn stalks and leaves as a primary substrate for growing oyster mushrooms. They have used dried banana leaves in the past too, but this time of year the corn material is highly available, and free to the farmers. Mushroom growing is done as a group, but each individual specializes in other various crops, including corn (maize), which almost everyone grows. Before growing mushrooms, these stalks were simply composted. The substrate is chopped and washed using soap and water. The water at this particular farm is treated by the city, and is drinkable (this is not the case in all areas in Malawi). The water does come with a high cost, and aside from the spawn is the most expensive part of each batch that is produced.


Ester just finished pre-washing the substrate. It is quite dirty.
The stalks are currently piled in the open, and are exposed to blowing dirt and debris. 
Fifteen liters of water are heated to boiling, 250g of hydrated lime is added, and dumped over the substrate which is contained within a large plastic bucket with lid. I took note immediately that the substrate was simply floating on top of the water, not being held down in anyway. Even if held down, fifteen liters is not enough water to cover the substrate. Using a compost thermometer that I brought along I measured the water temperature (something the group had never done prior). Immediately it dropped to 180 degrees (F), but within 15 minutes it had dropped to nearly 140 degrees (F) where it stayed at until the 30 minute soak was finished. Typically we recommend a longer soak between 45 minutes to an hour with a temperature that remains between 160-170 degrees (F).

Boiling water is poured over the substrate, but quickly the temperature
goes down below what is recommended for pasteurization. 
After the pasteurization process, the substrate is dumped out in order to drain and cool.
This process was being done outside with direct exposure to the elements. Depending
on how much the sun shines, this process can take nearly two hours. The group squeezes
the substrate to test for adequate moisture. If only a drop or two comes out, it is ready to inoculate. The substrate is then put into plastic tubs and brought in the house for inoculating. 
Once treated, the substrate is allowed to drain and cool in the open air. 
This farm has the basic concepts down for growing oysters on substrate, but minor adjustments must be made in order to best avoid contamination. Stay tuned for some
simple solutions I was able to offer them.


Wednesday, August 26, 2015

Tree Poultry - Chicken of the Woods
By Nik

Chicken of the Woods (Laetiporus sulphureus), also known as Sulphur Shelf, is an easily recognized polypore (it's actually one of the "foolproof four," along with the Morel, Giant Puffball, and Shaggy Mane) that has many special qualities that are often overlooked. In this blog, we will explore how and what to look for, how it can be grown, a bit of its biology and the aforementioned special qualities, and how to prepare it for a delicious treat. Join us, after the jump.


The author staring longingly at his quarry.

As alluded to in the opener and in the above picture, Chicken of the Woods is rather easy to spot. Its bright yellow and orange hues (which can add nice contrast against darker Shiitake and pastel Oysters in a Farmers' Market mix, by the way) jump out at you from the dark backdrop of the tree it's inhabiting. These large clusters and obvious color patterns are telltale signs that you have stumbled into the metaphorical coop (thankfully, these "chickens" don't run around erratically after they're removed from the tree). Another trait that denotes this fungus is its perennial nature. Year after year, and often several times in a season, the Chicken returns to the same spot (here on the farm, that's usually in late June and again in August).


Chicken of the Woods emerging from old branch stub wound


At the base of the tree, indicating root rot

Now let us slip on our lap coats and discuss our attempts at growing the Chicken commercially and the biology behind it. Here at F&FP, we have only attempted to grow the Chicken indoors on sterilized sawdust, as a curiosity. These attempts have all failed, but like with many of our other curiosity-driven experiments, we will continue until we find another way around the wall.

Other spawn producers do sell Chicken of the Woods, most often in plug form similar to our Shiitake plugs. There are two reasons we have steered clear of working on log cultivation of this fungus. The primary reason is that the Chicken is both parasitic and saprobic, meaning that it establishes itself (usually first through wounds when the tree is living) and then continues to fruit long after the tree has snapped off or uprooted. This is one of the reasons we cross our fingers when high winds cruise through the farmstead. The trees snap both midway up from a past infection or uproot from Chicken-caused root rot. The second reason is that there is already plenty of it around, so we tend to not want to encourage more.

Chicken of the Woods is quite abundant in NE Wisconsin, corresponding with the abundance of 130+ year old Northern Pin Oak. If we were diligent in walking the property throughout the summer to harvest them on time, we would have gluttonous amounts for both ourselves and our farmers' market customers. The Chicken also thrives in eastern North American forest types (think mixed deciduous).

There are several other Laetiporus species, two of which are found east of the Missouri River (like L. cincinnatus). You can tell the differences based on which tree they're growing on (and where it is growing), as well as what color the pores underneath the top surface of the mushroom are. The White Chicken has white (duh) pores and is found growing soil from associated tree roots and at the base of the tree (unlike the Yellow Chicken which grows at the base and on areas of the trunk). L. huroniensis grows mostly in the Great Lakes area on Hemlock. L. gilbertsonii also grows on Eucalyptus and Live Oak in the Gulf area and in the coastal western US, L. conifericola is found on conifers.

Let's briefly investigate a Chicken of the Woods lookalike: Dryad's Saddle (Polyporus squamosus). Some who are not familiar with the Chicken will assume this is the real deal. Though it is edible, you will need to be armed with an industrial-strength mandible and routinely do jaw exercises for endurance and strength. Plus, it really isn't all that tasty. You can see the difference in the photos below:


Dryad's Saddle on an ancient Box Elder stump


For the final course, I will leave you with some culinary ideas that utilize the Chicken. It is best harvested when young while its edges are still thick-rimmed with plenty of yellow coloration. Once the edges thin, you will want to only use the outer 3-4 inches of the specimen where it is still tender, so it pays to stroll frequently through the woods equipped with a bag and a knife. If harvesting for a farmers' market, pick freshest specimens only and take the entire cluster, trimming right before market if necessary. Keep refrigerated until market day! On to the recipes...

Grilled/Parchment Roasted Chicken of the Woods
Parchment-roasted Chicken of the Woods in a white cream sauce over toast,
with garden-fresh basil, cucumbers, and heirloom tomatoes 
This method is totally open to experimentation, and in the end the mushrooms and the resulting broth can be used either as a main course or a nice supplement. You will need:

1/4 cup balsamic vinegar or wine vinegar (if you don't care for the acidity of vinegar, you can substitute chicken or vegetable stock with a dash of lime)
2 tablespoons honey  (mix with the vinegar/stock)
4 cups sliced Chicken of the Woods
3/4 cup olive oil
sea salt and black pepper to taste and a few branches of fresh thyme (optional)

Cut Chicken of the Woods into 1/4 - 1/2 inch slices and place on tin foil (if grilling) or parchment (roasting). Mix together oil, vinegar, and honey and pour over the slices. It will seem like a lot of liquid but use it all, as it will steam the mushrooms to tender perfection. Season and lay the thyme (if using it) on top. Seal foil or parchment into a leak-proof package by folding the edges in and crimping the corners. Bake (375-400) for 30 minutes, flipping the package at least once.


Drizzling the vinegar/honey/oil mix onto sliced Chicken of the Woods
Parchment packet, just before the flip
If you want chewy, glazed Chicken fingers, bake until parchment is browned and the contents are glazed with a thin, rich syrup. For lighter steamed mushrooms with plenty of broth to enrich with a cream sauce to pour over toast or soup, roast for 30 minutes at 375 degrees.

To snack-a-tize your Chicken of the Woods, cut the vinegar from the recipe and have Ranch dressing available for a dipping sauce! Enjoy!

To continue your deep dive into the realm of the Chicken of the Woods, visit www.mushroomexpert.com.


Monday, August 17, 2015

The Road Less Traveled: F&FP in Africa (Part 1)
by Laura

This is one of two suitcases packed full of Oyster mushroom spawn, and some cloths too of course!
Recently Field & Forest Products was given the opportunity to participate in a program called Farmer-to-Farmer (F2F). This program is sponsored by Cultivating New Frontiers in Agriculture (CNFA) and is part of USAID. The concept behind this program is to take farmers from more developed countries, like the United States, and send them to assist farmers in other less developed countries. In this case, the country of Malawi in Africa.

With that said, here I sit on my plane ride from Atlanta, Georgia to Johannesburg, South Africa. This 15 hour flight should give me enough time to reflect on the assignment I am about to embark upon. I will travel to the city of Mzuzu in Malawi where I will meet with a small group of farmers referred to as the Tisange Group. This group of farmers is growing…mushrooms, more specifically oyster mushrooms. They need the assistance of someone with growing experience to help them overcome issues they are having. These issues are affecting the profitability of the crop. Marketing the mushrooms is also a challenge for the farmers.

Saying goodbye to the U.S., Georgia below.
This experience will be valuable to the company; the knowledge gained will be shared with our customers and countless others. Hopefully this trip will inspire others to be more proactive in humanitarian efforts, the mere thought of the help I will give is rewarding already. My absence from Field & Forest Products means that many of my co-workers are doing my job, so a big thanks to all of them! Also, Joe and Mary Ellen, the owners of our company were gracious enough to let me participate instead of themselves. I truly could not ask for more. The family support I have for a trip like this is incredible as well. As a mother of four, leaving home is never easy, especially when leaving for over two weeks. 
   

I will do my best to document this trip and share this amazing experience with as many people as I can. With uncertainties of internet availability and frequent power outages I am not sure how much I will share, but I will do my best. 

Thursday, July 16, 2015

Water Management of Shiitake Bed Logs for Incubation and Mushroom Production
by Joe

Our logs have been fortunate to have received consistent rainfall this summer. For those whose logs haven't....read on...

With spring shiitake bed log inoculation behind us, we now turn our attention on the farm to outdoor mushroom production and bed log management of those freshly inoculated logs.

Here at Field & Forest Products, we inoculate logs with shiitake spawn twice a year. Our spring inoculation is generally 250 to 300 logs while our fall inoculation is around 1000 logs. Both require different water management schemes after inoculation because of their very different post inoculation resting spots. Our spring inoculated logs are moved directly into the woods, or laying yard, after inoculation. Our fall inoculated logs are moved directly into an warm and humidified incubation room indoors for the winter. These fall inoculated logs are dead stacked, tarped, and ignored for the next few months (moisture management of shiitake bed logs indoors is more complex and will be discussed in a later blog as we continue to develop a protocol based on work done in Japan). However, the spring inoculated logs that are placed directly outdoors require a little more early attention.

With outdoor incubation, we depend on regular rainfall and the proper log stacking procedure to maintain log moisture content early on. Most problems in the fruiting cycle of mushroom cultivation are linked back to the initial spawn run phase, so it pays to give the inoculation and spawn run year lots of attention.

This year we have been extremely fortunate that we have had adequate rainfall so far (knock on wood). But let's assume the natural water faucet gets turned off for an extended period of time and our green lawn turns to brown and that leafy debris in the woodlot starts to turn crunchy underfoot. This usually precedes a call to action.

We were once told the three most important things to remember in shiitake cultivation were 1) moisture 2) moisture and 3) moisture. You get the picture; fungi need moisture in the wood in order to digest it, and if the rain isn't falling, we will need to take corrective action. This usually means irrigation. We like to see a rainfall event on our logs at least once a week that amounts to at least an inch, and if we don't see rain in a week or two, either we leave the car windows open overnight or hang the laundry out to dry. If that doesn't do it, the sprinklers are turned on. We have a rather sophisticated system consisting of an impact sprinkler and a long length of hose. When called for we will turn the sprinkler on late in the day and let it run for several hours or long enough to fill a coffee can with about an inch of water (or overnight if we forget about it). We will not water again until a lack of precipitation dictates us to.


These logs are irrigated bi-weekly (if there is no rain) for the first few months of spawn run. In this fairly shady laying yard, the "lean-to" stack configuration allows water to drain off the log surface, which allows the surface to dry between waterings.

A general rule to remember is this: It is best to irrigate heavily and infrequently than lightly and frequently. The reasoning is this: With heavy, long irrigation cycles, water is able to move into the bed logs through the butt ends and somewhat through the bark (That's why we don't recommend waxing log ends!). When the water is turned off the log surfaces can dry and contamination by surface molds is minimized. With light, frequent irrigation, water never really gets a chance to penetrate into the log and log surfaces never really dry out so contamination by undesirables can become a problem.

The most important time for water management in bed logs is during their first growing season as the spawn establishes itself in the log. Once spawn run is complete, by the end of the growing season there should be no further need to irrigate. Mushroom production will benefit from a slight dry-down of the bed log as rainfall coupled with a cool-down in temperatures mimics the approach of a typhoon in shiitakes natural range, thus stimulating mushroom production. For information on soaking logs, see the most recent issue of our newsletter Mycologically Speaking... (If you are not on our newsletter email list and would like to receive our quarterly newsletter, you can sign up here).

What if you don't have irrigation capabilities? First and foremost is your choice of stacking methods that will promote spawn run and slow down log drying rates. Imagine a line drawn from northeastern
Florida to northwestern Minnesota and think about the different growing zones you would pass through. In the summer I imagine Florida to be warm and humid during the day and night with people sleeping in air conditioned comfort. In Minnesota, sometimes the summer nights require the winter quilt and a fire in the kitchen stove. Air conditioning? What's that? Along that line we can also measure log drying rates. In the warm and humid Southeast, drying rates are slow, while in cool and dry Minnesota, drying rates will be considerably faster. The Southeast has a more forgiving climate for shiitake log-based cultivation due to its warmth and high humidity levels during the growing season. In the northwest, the wrong log stacking configuration could lead to the production of some pretty darn expensive firewood. So one can also imagine now, along that line as one would leave the humid southeast and travel to the northwest, ever decreasing log stack heights. Of course this is a very simplified explanation as local environment will also influence log stacking configurations but the general idea remains the same. The dryer the site, the lower the log elevation during incubation. By the way, consider placing your smallest logs in the stack on the bottom and largest on top. Your small logs should dry at an equal rate as the large logs this way. Right now with summer temperatures rarely reaching 80F so far in northern Wisconsin, we have our logs lying horizontal in a single layer and the winter quilts have been used quite a bit this summer.


These logs are too far from the sprinkler in this relatively open laying yard to benefit from supplemental watering so are stacked fairly low to the ground to take advantage of low wind speed and forest floor humidity during spawn run.

Lets say you are having a fairly rain free summer. What if a low stack isn't good enough to keep log moisture levels up without the usual weekly inch of rainfall? Well, there is always soaking logs in fresh water for several hours for them to rehydrate. We are not big fans of this as it adds more labor to an already very labor intensive crop, but if the log population is small and your back is strong here are a few suggestions:

Small diameter logs will dry out faster than large diameter logs, so soak those first. If the logs float, (We hope not!) weigh them down with concrete blocks, tractor wheel weights or some other hefty item. Several hours should be adequate to get water into the log. Do not be tempted to soak the logs longer than 24 hours as this could lead to anaerobic conditions within the log.

Do not attempt to soak logs for re hydration purposes after 4 months of spawn run have occurred. Sometimes a soak can bring on a premature effort to fruit which can weaken the running mycelium and thus overall log health. Sprinkling is a far better alternative at later stages of spawn growth.


Containers that keep moisture out should also keep moisture in! This Minnesotan's canoe will  moisten logs for spawn run as well as for forced fruiting later on. (Photo courtesy of Eagle Bluff Environmental Leaning Center)

Sometimes we forget that there is such a thing as too much moisture. For a crop that is native to regions where annual rainfall totals can be upwards to 80 inches, it is hard for many of us shiitake cultivators in the USA to imagine that happening. Logs that are placed directly or nearly so on the ground can suffer from green mold competitors, even here in the Midwest. If you see fresh post inoculation green molds in quantity on the bark during the first year of incubation, elevate and separate the logs to encourage more air flow. This should take care of the occasional mold problems found in shiitake logs during wet spells.


Ozark Mushrooms in Missouri stacks logs outdoors in a shaded structure and irrigates regularly with a timed overhead watering system to keep log moisture content up.

Something you can do to be more exact about assessing the moisture content of your logs is to establish a base line before you start any of this. This would be done by establishing "check" logs where the initial log moisture content has been predetermined. (By doing this you may find out that you don't need to soak logs after all.) This fairly detailed method is described in full here.

Look for signs of spawn run at the log ends a few weeks after inoculation or once daytime temperatures are in the 70s (F).

Many people, especially those who regularly get lots of summer rainfall (more then 30" annual precipitation), have the luxury of getting plenty of mushrooms without giving a thought to moisture management in the summer. By understanding the basic relationship between stacking method, rainfall and spawn run, growers everywhere can be prepared to enjoy years of plentiful harvest regardless of what Mother Nature hands us.


Make sure to check logs as the end of summer nears. These logs bore fruit at the end of summer after a heavy rain, signifying the majority of spawn run is complete.


Tuesday, July 14, 2015

Fish and Mushroom Soup

A generous splash of extra virgin olive oil
2-3 cloves garlic, minced
1 shallot, chopped
1 leek, chopped
A handful baby carrots, or a few large carrots
1 turnip
1 parsnip
½ fennel bulb plus a handful tender top greens, chopped
2 large lion’s mane mushrooms
1 large potato
4 fish fillets (white fish, cod, or another similar fish)
1 bay leaf
A pinch dill
A few saffron threads (optional)
2-3 tsp. herbes de provence (or a little thyme, basil, oregano, rosemary, and lavender
About 1 Tbsp. tomato paste
½ cup or more white wine
About 8 cups vegetable stock
Parsley, about ¼ cup
A squeeze of lemon juice
Salt and pepper, to taste

1.) Chop all veggies to bite sized.

2.) Sauté the garlic in the oil, followed by the rest of the veggies and sauté about 10 minutes.

3.) Add the wine and reduce.

4.) Add the stock, tomato paste, and herbs. Cover and simmer until veggies are almost tender.

5.) Add the fish and lemon and simmer until fish is cooked and veggies are done.

Side note: This could also be cooked in a crock-pot.


Bay Scallops with Polenta, Wild Mushrooms, and Sherry

     1 cup fresh breadcrumbs from French bread with crust
     2 tablespoons extra-virgin olive oil
     2 tablespoons chopped fresh parsley
     9 tablespoons unsalted butter, divided
     12 ounces fresh chanterelle mushrooms or other fresh
     wild mushrooms (such as oyster, stemmed shiitake, or crimini)
     2½ teaspoons chopped lemon fresh thyme
     1 cup chopped green onions
     ½ cup medium dry Sherry
     ¼ cup low-salt chicken broth
     ¼ cup whipping cream
     4 cups (or more) hot chicken broth
     1 teaspoon salt
     1 cup polenta
     1 pound bay scallops 

1.) Preheat oven to 350°F.  

2.) Toss breadcrumbs with olive oil and parsley in medium bowl to blend.  Spread onto rimmed baking sheet.  Bake until golden and crunchy, stirring occasionally, about 15 minutes.  Can be made ahead and stored in a Ziploc bag

3.) Melt 4 tablespoons butter in heavy large skillet over medium-high heat.  Add mushrooms and thyme.  Sauté until mushrooms are tender, stirring occasionally, about 7 minutes.  

4.) Add green onions; sauté 1 minute.  

5.) Add Sherry; boil until slightly reduced, about 2 minutes.  

6.) Add broth.  Boil until reduced by half, about 3 minutes. 

7.) Add cream; simmer until thickened, about 3 minutes (Can be made ahead)

8.) Bring 4 cups broth and 1 teaspoon salt to boil in heavy medium saucepan. 

9.) Gradually whisk in polenta.  Reduce heat to medium-low.  Cook polenta until tender, adding more broth as needed if too thick, and whisking frequently, about 20 minutes.
  
10.) Stir in 3 tablespoons butter.  Season with salt and pepper. Cover to keep warm.

11.) Reheat mushroom mixture.
  
12.) Melt 2 tablespoons butter in another large skillet over high heat.  Add scallops and sauté until just translucent in center, about 1 minute. 

13.) Stir scallops and juices into mushrooms.  Season with salt and pepper.

14.) Divide polenta among 6 plates.  Spoon scallop mixture over polenta, sprinkle breadcrumbs over, and serve.

Serves 6

Inspired by Lucques
Janice W. Thomas   10/3/13
Savoryspoon.com

Tuesday, June 23, 2015

Wine Cap and Gingered 
Hash Brown Cakes


This recipe, adapted from Antonio Carluccio's treasure of a recipe book "The Complete Mushroom Book: The Quiet Hunt"  is basically a hash brown cake with sauteed Wine Cap spooned on top. Wine Caps harvested as buttons and quartered make for a crisp yet succulent topping; a vegetable in its own right. Wine Caps keep the dark red color and white solid stems, and the taste and texture are mildly reminiscent, at least in this recipe, of a tender bok choy. If you are in a hurry and don't want to mess with cutting potatoes into sticks, you could even make it with bagged frozen hash brown potatoes. Working with these beautiful mushrooms though, (not to mention new potatoes from your garden) is utterly satisfying in its own right.

Wine Cap and Gingered Hash Brown Cakes
Serves 4


For the mushrooms:

1 1/4 c quartered fresh Wine Cap mushrooms, preferably buttons
4 T olive oil or butter
large clove of garlic, minced
pinch of ground red pepper flakes
3 T chopped chives or green onion
salt and pepper to taste
3 T chopped cilantro or parsley for garnish

For the hash brown cakes:

2 1/4 lb Yukon Gold, red potatoes, or similar variety, cut in thin strips or grated on large hole of a box grater for a more homey presentation
salt
2 oz fresh peeled ginger, cut or grated as above
8 T oil , divided
Fresh lemon or lime to squeeze on cakes to taste

Method:

Clean, trim, quarter (or slice if you have more open caps) Winecaps. You can use the stem as long as it is tender and solid. Heat the olive oil or butter in a frying pan and add onion/chives, garlic, and red pepper flakes; saute until just tender. Add mushrooms and saute until mushrooms are cooked through. Season to taste and keep warm until potatoes are cooked.

For the cakes, pat sliced or grated potatoes and ginger with a towel and lightly salt. Divide in two portions. Heat half the oil in the fry pan and mound the mixture in the center and flatten to a pancake. Cook on a medium to medium low flame for about 10 minutes, flip onto a dinner plate, add the remaining oil and slide the uncooked side of the cake onto the hot pan, cooking another 10 minutes or until golden. Do the same with both potato portions. Lift the cakes with a spatula onto a serving platter and spoon mushroom mixture on top, garnishing with lemon or lime slices and cilantro.

To further impress yourself or anyone else who approaches with a fork, serve with a crisp chilled white wine or cold summer shandy beer. Perfect.