Friday, July 6, 2012


This Summer….Go For the Gold
Written by Mary Ellen

A cluster of Goldens waiting for harvest.
Yes...it’s on all our minds... not what happens in London this summer at the Olympics, but which mushroom will we be harvesting in July?

The Golden Oyster is the obvious choice. Sure, we’ll be filling our baskets with shiitake that have been force fruited (soaking the logs 12-24 hrs in cold water), some Winecaps brought in with a cold summer thunderstorm, and maybe some wild foraged Chanterelles, but in the world of Oysters grown on wood logs, the Golden is the Queen of Summer, fruiting repeatedly when the temps hover in the 80’s.

One of many harvests from a Golden Oyster Totem.

Golden Oysters are different than the rest of the Oyster mushroom crowd; their texture is crisp, the smell is sharp, the flavor clean. For that rich, deep forest mushroom flavor, go for the more complex fall fruiters such as Polar White and Blue Dolphin, or the unusual Rose (or Pink) oyster (reserved for a later blog post), but plan on the sunny Golden Oyster for the summer. If you don’t want to eat it, make it into a vibrant garnish, or even more dramatic would be a centerpiece featuring a single Golden Oyster clump. Either way, it’s a winner.


Polar White Oyster mushroom.
Blue Dolphin Oyster mushroom.
Rose or Pink Oyster mushroom.

Golden Oyster cooking and handling notes:
Golden Oysters are very delicate so they must be handled carefully. Larger caps (4 inches across or more) may be more richly flavored, but the stems slightly bitter (and mostly unusably tough, anyway), so use the caps only on these specimens. Cleaning: These usually do not require cleaning, but some outdoor grown oysters are harvested at soil level so they may be slightly gritty. To clean, apply a fine, hard spray of water directly and quickly to the gills and cap, minimal moisture! Blot quickly with paper towel.

The vibrant golden color dims when cooked, but this can be minimized by adding them during the last stages of cooking. Most chefs now tear the mushroom rather than slice, and it is certainly faster.

Serving suggestions: These delicate mushrooms are best lightly sauteed and added to mild dishes such as noodles or fish with a light cream sauce. Serve your Golden Oyster creation with a Shiraz or a Pinot Noir (Natalie recommends Bogle Pinot Noir), or for brew loving Wisconsinites, Leinenkugel's Summer Shandy. Then… for this season only, bring your plates to the telly and enjoy the London Olympics!

Golden Oyster in the foreground and Maitake in the back.

A Golden salad for the season.
Summer Salad of Golden Oysters, Garden Greens and…

While Oyster mushrooms can be eaten raw as one might do with a button mushroom in a salad, the flavor is more complex if they are cooked first. This salad is a mix of greens dressed lightly with your favorite vinaigrette, then topped with roasted or sautéed oyster mushrooms and whatever else you have that provides a range of textures and accent flavors. Use the fresh oysters as visual garnish.

Step 1: Golden Oysters are fragile and the best ones have small caps; so if you are harvesting your own, choose caps the size of half dollars or smaller. Larger caps must be torn into pieces. Either sauté until crisp around the edges in butter or gently toss the whole caps with oil (about 1-2 Tablespoons of oil per pound of mushrooms), spread out on a baking sheet, and roast at 350 degrees (F) for about 20 minutes or until edges are browned and crispy.

Step 2: Prepare a mix of fresh salad greens and toss with your favorite vinaigrette.

Step 3: Set aside assorted textural additions; a combination of several of the following: dried or fresh cherries, celery, pea pods, sliced red pepper, cherry tomatoes, tiny cubes or crumbles of cheese, crisp pear slices and walnuts for later in the summer. Don’t ignore salty crunchy things such as roasted nuts or possibly chow mein noodles.

Step 4. Spread out the salad greens onto a big serving platter, liberally sprinkle the mushrooms over the greens and have fun adding the rest. Don’t forget to garnish with fresh Golden Oysters!

Thursday, April 19, 2012


Cold Weather Shiitake and 
the Magic Tablecloth
Written by Mary Ellen

I love the tale of the Magic Tablecloth. It’s Russian. A culture renowned for its love of mushrooms and picnics in the woods. This tablecloth can produce a feast at the utter of a command.

Well, you too may have the concept of such a cloth if you have cold weather strain shiitake mushrooms in your woods. These mushrooms keep on the logs for a long period of time; over a month, magically ready at the warming of the pan. Your woodland garden becomes a grocery store in the spring, each mushroom ebbing and swelling in size with passing spring thunder storms, intermittent dry winds and snow showers.

This cold weather strain “Chocolov” could easily be mistaken for a chocolate truffle!

Cold weather shiitake are dense and meaty; well known, for such qualities by vegetarians.

Spring shiitake, as a commercial crop, are hard to manage here in the upper Midwest. This is not so in the South where they can fruit on and off through the winter months. Parts of the country that maintain long stretches of temperatures where daytime highs range from the 30’s to the 50’s can achieve abundant harvests by misting pinning logs. But we are windy and cold… wait, hot….wait! Cold weather shiitake, trying to break loose from chilly, stalwart bark, starts and stops and starts to grow. It’s amazing to me that we saw our first full-sized spring shiitake on March 7th. I just picked those very same mushrooms last night for dinner, April 18th. 

On the log since early March, we’ll be enjoying this cold weather “Bellwether” this May Day if the weather stays cool!

It’s also difficult to keep the mushrooms from drying out in the spring. You can wet a fruiting blanket and cover the pinning logs, but keeping the blanket wet is difficult with stiff spring winds. You can tarp the wet blanket with plastic... perhaps too much work to manage unless you have all your cold weather strains consolidated. Otherwise, mushrooms can dry right on the log and can be weird, contorted and vericolored. It can be difficult to tell the stage of these mushrooms by simply looking at their caps... check the gills to see if they are white, not yellowing or brown, which indicates they’re not past their prime.   
Mushrooms with gold colored gills and leathery caps may not recover from wind and heat, and may be best off on the dryer tray. (The bite marks on the smaller mushroom above are probably from a white-footed mouse, who doesn't mind a mushroom a little past its prime!)
Much like the magic tablecloth, the shiitake possess their own secret charms. Give them a rainstorm and a little heat, and the hard dry lumps transform into gorgeous, thick caps with a mosaic of brown colors and geometric shapes. Given a hot/cold spring like we’ve had, we’ll be harvesting cold weather shiitake well into May. Just in time for picnics in the woods as we look for Morels!

These lumpy mushrooms, given enough moisture, will develop into gorgeous specimens.
Quick stir fry with frozen filet beans from last year's garden, and a finish of oyster sauce sprinkled with sesame seeds, makes an utterly satisfying dish.

“And somehow or other it had covered itself with dishes and plates and wooden spoons with pictures on them, and bowls of soup and mushrooms and kasha, and meat and cakes and fish and ducks, and everything else you could think of, ready for the best dinner in the world.”  - Ransome, Arthur. Old Peter's Russian Tales. London and Edinburgh: T. C. & E. C. Jack, Ltd., 1916.


Image above - Mikhail Sukharev. Magic Tablecloth.

Sunday, March 25, 2012

Shiitake and Red Pepper Pesto

Add these delicious Shiitake mushrooms to pesto for a twist.

2 red bell peppers, halved
About 10 med-large shiitake caps
½ C fresh basil
3 Tbsp pine nuts
2 cloves garlic
¼ C extra virgin olive oil
½ C Parmesan cheese

Rub the mushrooms and peppers with canola oil and season lightly with salt and pepper. Roast for 20-30 min. at 375(F) or until soft and slightly charred. Immediately transfer to a bowl, cover with plastic wrap, and let steam for 10 minutes.

In a blender or food processor, pulse garlic, basil, mushrooms, and peppers until roughly chopped. Add EVOO slowly. Add cheese, salt, and pepper to taste.

Friday, March 9, 2012

Shiitake Crab Cakes with Roasted Red Pepper and Asparagus Sauce
Created by Rachel

After whipping up this mouth watering crab creation, Rachel topped it off with some sprouts and balsamic vinegar. This small portion was all the entire staff at F&FP had to fight for, and sadly not everyone made it out alive. It was THAT good! 

Crab cakes really hit the spot when craving a guilty pleasure. Adding shiitakes and using red pepper and asparagus in a sauce added a new dimension to the traditional cakes. The sauce is more of a spread than anything and is really nice when served cold with the warm cakes.

Here's what you'll need:

About ½ lb crab meat, chunked
1 bunch green onions, chopped
½ C sour cream
About 2 C Panko bread crumbs
About 1/3 C parmesan
1 tbsp lemon juice
Salt and pepper
Garlic powder
3 C Shiitakes, thinly sliced
1 small shallot
½ small white onion
2 cloves garlic
1 tsp thyme
1 tsp tarragon
2 tbsp parsley
1 tbsp chives
1 tsp or so red pepper flakes
1 tbsp celery flakes
2 eggs plus 2 tbsp water, beaten
1 C flour
2 Tbsp extra virgin olive oil
About 1 C coconut oil, or other frying oil

Heat the olive oil in a skillet, add garlic, white onion, and shallot. When soft, add shiitakes. Add thyme, tarragon, salt and pepper, chives, red pepper and celery flakes when almost done. Set aside to cool.

In a large bowl, combine crab, sour cream, 1 C Panko, green onions, parmesan, and lemon juice. Add garlic powder, salt, and pepper to taste. Mix in cooled mushroom mixture. Add bread crumbs if it is not sticky enough.

On a plate, combine the flour with salt, pepper, and a little thyme and sage. Beat the eggs and water together in a bowl and pour about 1 C bread crumbs on another plate. Form small cakes and coat first in the flour, then the egg, then breadcrumbs.

Heat the oil in an iron skillet until sizzling, add the crab cakes and cook until dark golden brown, keeping an eye on the oil so it doesn’t overheat. Pat off excess oil and serve with sauce and sprouts and drizzle with balsamic vinegar.

Roasted Red Pepper and Asparagus Sauce

1 half bunch small asparagus stalks, tough ends trimmed off
2 large red bell peppers or about 5 small, cut in half
extra virgin olive oil
salt and pepper
lemon juice
about 8 oz ricotta cheese
a little grated parmesan

Toss the peppers and asparagus in oil and lemon. Sprinkle on salt and pepper. Roast at 375 degrees for about 30 minutes, or until soft and slightly charred.
Using an immersion blender or food processor, puree the peppers and asparagus with the Parmesan and ricotta. Add salt and pepper to taste.

Friday, February 3, 2012

Put Your Stock in Mushrooms...or Put Your Mushrooms in Stock

Dont let the look of mushroom stems deceive you. These things are packed with flavor.
Here at F&FP, we have a weekly toss of all the unusable mushroom bits and compostables.This includes coffee grounds (go figure), old mushrooms, and stems. Often thought of as woody and useless, the stems are usually thrown out and composted. Composting is great, but what if we could make use of these stems? Many people (myself included) become so excited when they find new and innovative mushroom recipes we forget the very foundation upon which those recipes were created. Personally, I didn’t really want to bother with it. For some time, Mary Ellen has been hinting around for a mushroom stock recipe, so I’ve finally gotten over the apprehension and experimented.

At first glance, mushroom stems appear, for lack of a better word, gross. They’re usually covered in dirt or wood particles and have a funny smell. Once you get over the thought of those in your soup, however, their prospects are quite lovely. When simmered slowly, the stems release their pungent mushroom flavor and lend a silky brown color to your stock, which can then be used for soup, gravy, casseroles, etc… For some, pure mushroom stock may be a bit too overpowering. Using a variety of other vegetables will tone down the strong flavor. In addition, including a few key ingredients early in the process will create a harmonious marriage of flavors making for a smooth, luxurious taste experience. These “secret” ingredients may include ginger, shallots, carrots, kale, thyme…the list goes on and on. You have control over the ingredients, including sodium, which makes it unparalleled by store-bought alternatives. Stock is incredibly versatile, so make it work for you!

I have to admit, the thought of making a stock from scratch was a bit intimidating. What if it didn’t turn out and all that time was wasted? I couldn’t help but picture Gordon Ramsay yelling choice expletives. However, the process really is quite simple, effortless and honestly, hard to mess up. The end result is well worth the time and will fill your house with the tantalizing aroma of homemade goodness. During the simmering process, you may notice a few specks of the substrate used to grow the mushrooms floating around. This is ok, as they will be strained out at the end and are completely harmless. The stock will keep in the refrigerator for a few days or may be canned or frozen for future use.

Surprise your taste buds with some Mushroom and Tofu Soup.
Mushroom Stock

3 to 4 C mushroom stems-dirt trimmed away
2 large carrots, chopped
1 small onion, chopped
1 stalk celery, chopped
2 cloves garlic, minced
About 1 inch fresh ginger, peeled and chopped
About ¼ C soy sauce
A pinch of sage and thyme
About 10 C water, more if you prefer
Drizzle a little olive oil in a large pot and add the garlic and onions. Saute for a few minutes then add the rest of the ingredients. Cover and simmer for about 2 hours, or until the stock is dark and flavorful. Let it cool a little, and strain through a cheese cloth to remove any undesired particles. Twist and press to squeeze out the excess liquid.


Mushroom and Tofu Soup

The vegetables in this soup can be omitted or substituted. If seaweed isn’t for you, simply leave it out. Miso would go a long way in this soup if you like its flavor, I just didn’t have any on hand at the time. Adding a dash of your favorite stir-fry sauce would create a little variation.

8 C homemade mushroom stock
About 2 C Shiitake mushrooms, sliced thin
1 clove garlic, minced
A small piece ginger, minced
1 small shallot
1 small can bamboo shoots
1 small can sliced water chestnuts
½ block extra firm tofu, cut into bite size squares
Fresh or frozen snow peas, a handful or two
2 Tbsp parsley
1 Tbsp chives
About 1 tsp red pepper flakes, more or less as desired
1 sheet nori or wakame (or any seaweed product. It is typically located near the specialty/natural foods section in grocery stores), soaked then torn into small pieces
A squeeze of fresh lemon juice
Lightly sauté the shallot, garlic, and ginger in olive oil. Add the stock and mushrooms, cover and simmer for about 20 minutes. Add the remaining ingredients. Cover and continue to simmer about 10 more minutes.

Tuesday, January 24, 2012

What's for Lunch? 
Written by Joe

What is this delicious looking creation that Joe is about to devour? Looks like a shiitake sandwich!

One of my favorite things to eat for lunch is a shiitake sandwich. Though one could really play with the last two of the previous sentence, I find a shiitake sandwich makes me happy, healthier and really gives me that “full” feeling after I’m finished eating.

Lunch has always been my downfall when it comes time to lose that extra baggage I put on between the holidays and/or during a snowless winter when I can’t get out to ski. The shiitake sandwich, I find, is a great way to eat well, feel satisfied and get me on the path to consuming fewer calories at lunch.

Last week I had promised our employees I would make shiitake sandwiches for lunch and I didn’t get around to it until this week when they started to look really hungry. The sandwich requires a few ingredients and you can make it as simple or as gastronomically complicated as you wish.

I start by finding shiitake mushrooms that are a bit too open for our retail accounts. Some growers would call these “grillers” as they are generally large and wide open with the gills fully exposed. After trimming the stem off, I put equal amounts of olive oil and butter (we’re cheeseheads remember, so it is always butter) into an iron frying pan over medium high heat. I allow it to melt until it’s hot and the mushrooms sizzle when they are put into the pan. I fry gill side down first until the gills turn a golden brown color. I then flip the mushrooms and add whatever seasoning I am in the mood for. I am partial to sea salt. I like the salt burst when eating, as does my blood pressure. At this time, one can also add a thin layer of cheese if desired. Some of my favorites are any of the white cheeses: Monterey Jack, Swiss, Mozzarella, or Muenster. Feta cheese is also wonderful as it gives an added dimension of flavor.

Shiitake caps sizzle in a butter and olive oil mix.

While the cheese is melting, take two slices of bread and lightly cover one with a thin film of mayonnaise. I find white bread to be the best, particularly Lake Superior Sourdough or even better, a fresh loaf of French bread made by Mary Ellen. Whole wheat breads tend to overwhelm the shiitake and other flavors, but I will use them if nothing else is available...

All this sandwich needs is a few more mushrooms and another piece of bread.

When the cheese is melted, place the mushrooms on the bread, top with the other slice of bread, and enjoy while it is still warm. I’m still looking for a good locally brewed beer to couple with this sandwich, but alas that will have to be another blog.

Friday, January 20, 2012

Shiitake Log Inoculation at F&FP
Brought to you by Team FFP


This video is great for anyone new to shiitake log inoculation, but also serves as a nice refresher for those who are more experienced. We had a great time making this, and truly hope you can enjoy it as much as we did. Good luck with your future log inoculations!


Tuesday, January 3, 2012

A Peek Underneath
Written by Laura

Our shiitake logs have been laying indoors since Thanksgiving. It has been well over a month, and we are pleased with what we are seeing beneath the plastic sheets. What exactly are we seeing? Mycelium! We often get calls with concerns when this white substance makes its way to the surface. Some mistake it for mold or some other unwanted invader organism. Rest assured, it's mycelium.

The mycelium on these logs coincide with spawn placement.

This log, inoculated with West Wind, is showing a tremendous amount of growth.

These logs have been dead stacked (like stacking firewood) and covered with cardboard and plastic. On average, the room they are in has maintained temperatures between 62 and 72 degrees Fahrenheit. Ideally temperatures should be closer to 77 degrees, this allows for optimal spawn run. Our logs are forced to share a room with our mushroom bearing sawdust blocks, so temps are cooler to induce fruiting. The logs themselves will not be fruited indoors. Come spring they will be moved out into our laying yard to enjoy the fresh air and natural elements.      
Tuesday, December 20, 2011

Have Yourself a Very Merry Cracker…with Mushroom Butter
Written by Mary Ellen

Delicious Shiitake Butter spread over water crackers.
One thing nice for the overwhelmed holidaymaker this time of year is that the average Christmas party is not a potluck. (although come to think of it, the FFP Christmas party was a potluck) But what cook among us can resist responding to the invitation with “Can I bring anything?” It’s not much of a guess that if your hosts know you are a mushroom grower, the answer will be “sure…. bring something mushroomey!” For those of us who grow our own Shiitake mushrooms, there is an easy fix to this extra task that will make us look as amazing as we deserve.

Enter the Mushroom Butter. Here is the perfect food for such occasions. It’s elegant, versatile and truly, above everything else, it is delicious. A dish of Shiitake Butter surrounded by expectant crackers makes a nice presentation and superior switch from the boring cheese and cracker. A 3-6 oz container slathered on a square of bread dough with an ample over-layer of grated Asiago cheese, rolled and baked, makes an elegant appetizer or dinner bread. Even a few tablespoons stirred into a lowly bowl of cooked frozen broccoli will transform the vegetable.

This dough has just been slathered with Shiitake Butter and Asiago cheese.
No one at F&FP complained while eating this mouthwatering homemade treat!

But first, to clarify; this mushroom butter is actually a compound butter, not mushrooms cooked down into a brown puddle of spreadable vegetable matter such as you might do with apples. This is a blend of cooked and seasoned, pureed mushrooms, blended with equal amounts of butter, but before you think of it as overly rich, remember that this is butter at half the calories and twice the taste, so it’s relatively healthy!

Here is the basic recipe for Shiitake Butter:

Ingredients:
Shiitake, stems removed, to weigh 1 lb.
2 Tbsp butter
1 small onion
1 tsp salt
1 tsp sugar
1 Tbsp soy sauce
About one and a half pounds of salted butter, softened


Method:
Tear up a pound of stemmed shiitake. You’ll be cooking these down and pureeing, so large pieces are okay.

With medium heat, melt 2 Tbsp butter in a medium skillet and add 1 small chopped onion, sauté until soft. Add mushroom pieces, stir around a bit and cover the pan. Every few minutes, check the pan and stir things around, keep the heat warm enough to cook the mushrooms but try to avoid browning the onions. Once the
mushrooms start to cook down and you see a liquid at the bottom of the pan (about 5-10 minutes) add the salt and sugar. Reduce the heat and keep stirring things around every few minutes until the cloudy liquid at the bottom of the pan starts to become clear. Remove the lid and add soy sauce and cook a few minutes more, then off the heat.

COOL the mixture (duxelles) until it reaches room temp. Stir things around in the pan as it sits to aid in even cooling. Once the mushrooms are only slightly warm to the touch, puree in a food processor until the mixture is a paste.

HERE is the secret to making an excellent shiitake butter: make sure everything, especially the ingredients and mixing bowl, is at room temperature for this final blending of mushroom puree and butter!

What is room temperature butter you may ask? If the Sami people of the far north have hundreds of words for snow, the pastry chef ought have the same amount of words for butter, but the best description might be “medium soft.” Ready a mixer with a whip attachment if you have it; otherwise regular beaters will do.

Measure out your puree and ready an equal amount of medium soft butter. The puree volume can vary depending on the raw mushrooms moisture content, but it should be around 3 cups.

Whip or beat the butter till fluffy, then stir in the puree, finally whipping it, until the butter and mushrooms are well blended. This is the secret to making a consistent, well blended butter. If components are too warm , you’ll end up with soup; too cool, you’ll end up with chunky butter.

This makes about 3 lb. Shiitake Butter. Transfer to individual deli containers or jars for gifting, or wrap in freezer paper. This recipe can be doubled with a standard 4 ½ qt mixing bowl.

Before you think that I’m overlooking the fact that many of you don’t grow mushrooms in the deep of winter, know that it can be made out of the frozen mushroom duxelles you have squirreled away in your freezer from your abundant fall harvests. Bring the duxelles to room temperature before pureeing. Butter made from these duxelles can be refrozen, though for optimal flavor should be used within a few months. Mushroom butter made from fresh mushrooms, however, double wrapped, can be frozen up to 8 months, so its nice to put up a supply when mushrooms are in full season.

This year my sister asked for a “log of mushroom butter” for Christmas, which could be a clever double entendre as many of us grow Shiitake mushrooms on wood logs. But of course she means a sausage shaped roll of Shiitake Butter wrapped in parchment that she can put in the freezer and whack off a chunk whenever she needs some. What a great Christmas present idea!

Have an amazing, Merry Christmas!

Tuesday, December 6, 2011

Operation Inoculation, Complete
Written by Laura

Over 500 newly inoculated logs are stored indoors at a temperature near 70 degrees Fahrenheit. The logs have been dead stacked and covered with cardboard to absorb any moisture released by the logs. Next they will be wrapped in plastic (see below).

Today we finished up our fall inoculation with the covering of our logs. I must admit it feels good putting a lid on the entire project. Lots of hard work went into getting our logs to their current state. With callused hands (for the newbys anyway) we can just sit back and be proud of what will one day become a bountiful mushroom harvest.

The whole process took us several days, spanning nearly two weeks. We still had to continue with the day to day runnings of the farm, so at times many of us would disappear from the ranks. Orders still had to be processed and packed. Spawn had to be made, and mushrooms picked. Luckily the hired temporary help were pretty reliable. A successful inoculation can easily be attained with good help, good music, and good coffee.

When Mary Ellen moves logs...Joe is sure to wear his safety glasses!
Joe uses a high speed angle grinder with adapter to get the logs drilled quickly.

As you can see...Jasen, Rachel, and Jeni take this job seriously. Laughing is absolutely not tolerated! Notice how Jeni is using our new Dual Tool and Rachel is using our traditional Palm Tool. What's nice is that the Dual Tool can be used with either the palm or thumb.

Brian, an elected helper, meticulously waxes each log, making sure no hole goes unfilled.


Our logs are now draped in plastic. This method insures adequate moisture content. 
This concludes our fall inoculation journey. Come spring, all of these logs will be moved out into our laying yard. We expect the first fruits of our labor sometime in mid-summer. We truly hope that our fall inoculation series of blog posts has taught you something you never knew before. Good luck to all of our Shiitake growers!


Wednesday, November 23, 2011

Mushrooms and Wine
Written by Natalie


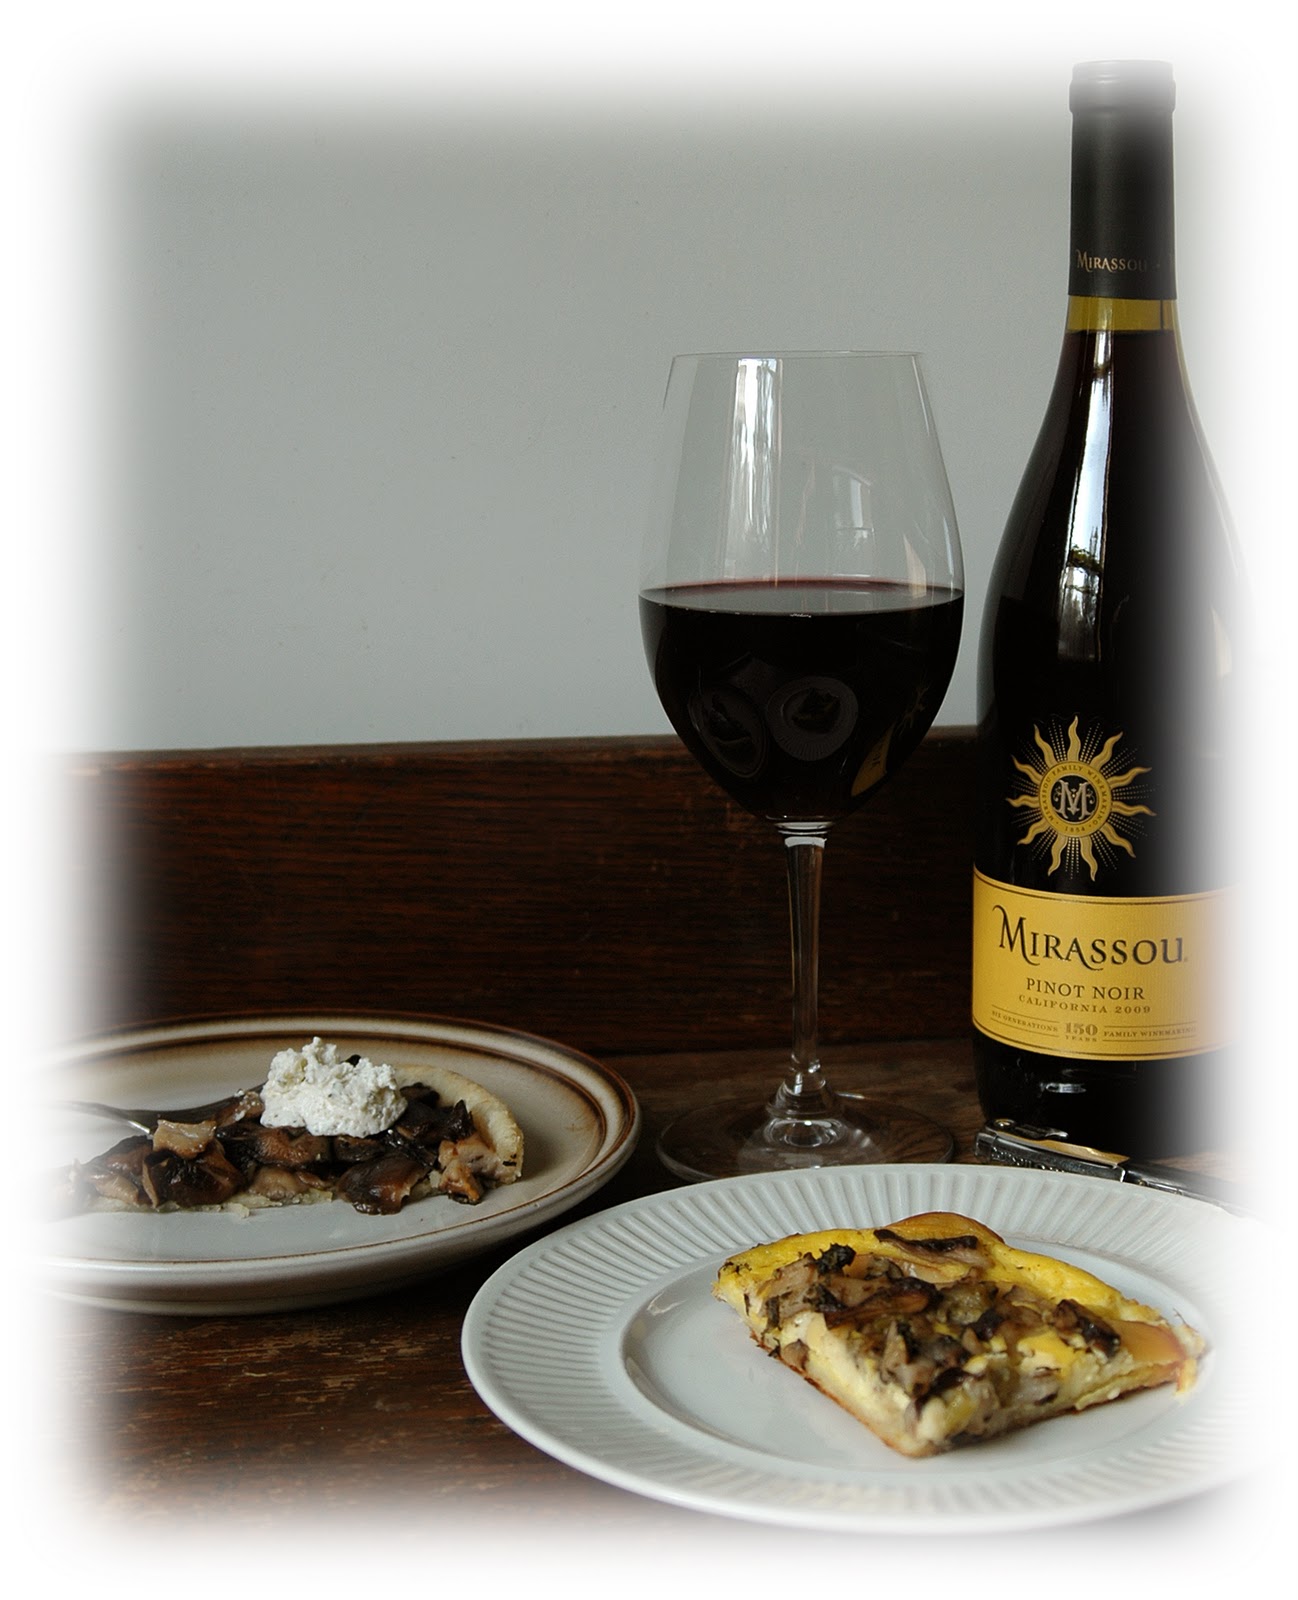
A pinot noir pairs nicely with Rachel's Shiitake and Cheese Tart.

The pairing of food with wine can be intimidating, especially when it comes to festive occasions or special events. Mushroom dishes can be particularly challenging, because both the type of mushroom and the preparation of the dish with its spices and sauces, play an integral part in determining which wines will complement them.

The basic concept of wine and food pairing comes down to determining which combinations complement or enhance the aromas and flavors of both the food and wine. Wine and food can complement or contrast each other, as long as they do not mask each other’s unique flavors and characteristics. Some general guidelines are:

* Sweet foods taste less sweet when paired with tannic wines.

* Salty foods emphasize the tannins in wine.

* Salty foods mask the sweetness while pronouncing the fruitiness of a wine.

* Salty or sweet foods will soften wines that are acidic.

* Acidic wines will have a cleansing mouth-feel with foods heavy in oils.

* Proteins soften harsh tannins, which is why red tannic wines work well with beef and game.

* Spicy foods often pair well with fruity, low-alcohol wines like riesling and gewurztraminer.

* Sweet foods generally go well with wine that is slightly sweeter.

* A wine high in tannins (like cabernet sauvignon) paired with a food high in tannins (spicy tomato sauce) will make the wine taste very dry and astringent.

Simply put, light white wines like sauvignon blanc, pinot grigio, semillon, or chardonnay generally go well with delicate, light foods (light cream sauces, simple sautés and other lightly seasoned mushroom dishes). Heartier dishes involving red meat, wild game, or rich stews are usually best paired with fuller bodied red wines like pinot noir, nebbiolo, or cabernet sauvignon. Dishes that fall somewhere in between may pair well with a lighter red, like a beaujolais, or a fuller bodied chardonnay. You are trying to achieve balance: a good pairing is one where the food and wine do not overshadow each other.

Mushroom variety also plays a role in choosing a wine. Again, delicate varieties, like lobster, enoki, maitake, and oyster, are best served with lighter white wines, such as sauvignon blanc, semillon, riesling, a light chardonnay, or light, fruity reds, like beaujolais. Earthy, hearty mushrooms like shiitake, portabella, porcini and morel pair well with fuller bodied wines, like a barrel-aged chardonnay, pinot noir, nebbiolo, syrah, cabernet sauvignon or zinfandel.

It’s important to note that in creating or choosing dishes featuring mushrooms, the best advice is to look for simplicity. Less is more when it comes to drawing out and highlighting the flavors of the mushrooms. Keeping things simple can also make wine pairing easier, as there are fewer elements involved that may affect your choice. For example, sautéing mushrooms in a little butter or olive oil, with light seasonings and served over pasta is a great way to emphasize the flavors of mushrooms, and is easily paired with a pinot grigio or chardonnay.

There are times when your mushroom dish includes other ingredients that make pairing difficult at best (like artichokes or asparagus). If you are stumped with what might work with your menu, ask one your “local” wine experts (the wine purchaser at your local market, the sommelier or head waiter at your favorite restaurant, or your wine geek friends). They’re generally experienced in pairing and eager to provide recommendations (and maybe some recipes too!).

Keep in mind that there are many exceptions to the rule. Use the guidelines given in this post as merely a starting point. My best advice: drink what you like and don’t sweat the details (after all, wine should only give you a headache if you’ve overindulged, not before you’ve even decided what to drink). Half the enjoyment is in the experimenting: invite a group of friends together with a variety of dishes and wines to taste. You’ll soon discover your personal pairing style (complementing or contrasting), and have some favorite combinations of your own to share!

In closing, all of us at Field & Forest Products will raise our glasses this Thanksgiving Day to toast our families, friends and loyal customers who remind us how truly blessed and thankful we are.

Mushrooms with Sherry, Shallots, & Parsley

This recipe is a variation on a tapas bar classic in Spain. You can use an assortment of mushrooms in this dish (I prefer oyster and shiitake). It’s best served with slices of toasted or grilled crusty bread, and pairs nicely with a glass of crisp white wine or dry Spanish sherry. 

Ingredients
2 TBSP. extra virgin olive oil 
2 shallots, minced 
sea salt, to taste 
1 clove garlic, minced 
6 cups assorted mushrooms, stemmed and cut into bite-size pieces 
1/2 cup dry sherry (not cooking sherry!) 
juice of one lemon 
handful of parsley, 
roughly chopped freshly ground black pepper 
simple aioli sauce (see recipe below) 
sliced and toasted loaf of rustic, crusty bread for serving 

Heat a large saucepan over medium heat. Add olive oil and the shallots. Sprinkle with salt and sauté until translucent. Add the garlic and stirring often, cook for one more minute. Toss in the mushrooms, sprinkle with a little more salt, and sauté for five more minutes, stirring occasionally. Remove the pan from the heat and add the sherry. Return to high heat and cook (uncovered) until the liquid is gone. Add the lemon juice and parsley and sauté one minute more until the mushrooms begin to caramelize. Adjust the seasoning with more salt and freshly ground black pepper to taste. Serve immediately with slices of toasted bread speared with simple aioli sauce (optional). 

SIMPLE AIOLI SAUCE 

Ingredients 
3/4 cup mayonnaise 
3 cloves garlic, minced 
2 1/2 tablespoons lemon juice 
3/4 teaspoon salt 
1/2 teaspoon ground black pepper

Mix mayonnaise, garlic, lemon juice, salt, and pepper in a bowl. Cover and refrigerate for at least 30 minutes before serving.