Friday, February 27, 2015

New Okuda Log Inoculation Tools Make Your Spring Log Inoculation Faster and Easier! 
by Joe

Field and Forest Products is pleased to announce that we have reached an agreement with Okuda Shiitake of Japan to distribute their sawdust spawn inoculation tools in the United States and Canada. Japan has been a leader in log based Shiitake cultivation since the 1940's and have applied their well-known quality precision machining to shiitake inoculation tools. While these tools cost a good deal more than our Wisconsin made palm and thumb style tools, the savings come to you with automation of the inoculation process. They deliver spawn fast, accurately, and three of the tools eliminate an extra step and the cost of wax application should you choose to use the foam capping version. When considering buying these tools, time as money might well be included into your cost-benefit calculations as well as getting inoculation done in a timely manner, taking advantage of prime log moisture content, and enabling faster spawn run.

During this past fall's inoculation, we were able to field test Okuda's inoculation line with the exception of the fully automatic inoculation machine.  We found all the tools to be of excellent craftsmanship, as well as easy to use and maintain. Like anything new, these tools do have a learning curve, but are easily mastered. I'll give you a run down of each one. FAQs are at the end of the blog!


Inoculation stick; the ultimate "dual tool" 

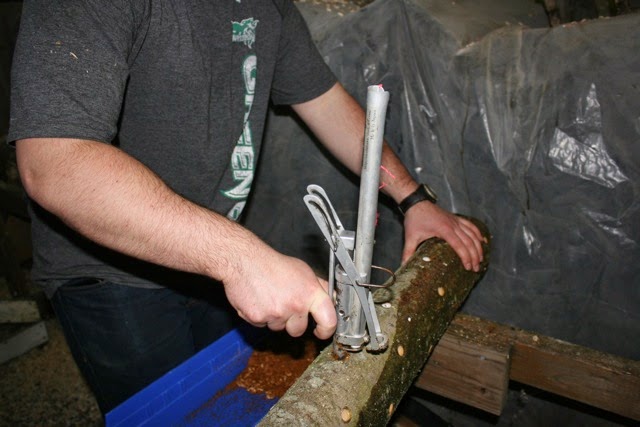
Okuda's Inoculation Stick is a compact (15 cm or just shy of 6 inches) stainless steel, hand held sawdust spawn inoculation tool. Its compact size enables the user to inoculate with one hand. Using the palm of the hand to exert downward pressure on the tool, sawdust spawn is forced into the inoculation site. This tool makes inoculating crooked or twisty logs easy to do as it frees your other hand to hold the log steady.
The spring gauge on the inoculation stick is such that only minimal pressure is needed to press down on the tool. A replacement spring comes with the tool and is easy to replace. The tool is very easy to clean and being stainless steel, cleans up to a like-new sparkle after each use. If I was looking for a tool that would last a lifetime and was planning on doing 100 or so logs a year, this would be the tool I'd buy. The inoculation sites can be sealed either with a foam cap or melted wax.

   Our Thumb-Style and Palm-Style Inoculators, manufactured here locally, can be operated efficiently using thumb or palm (respectively), but not both (our Dual Tool Inoculator could be operated either way, but unfortunately, it is no longer available). These tools are a good value at a fraction of the cost, but the hands fatigue more quickly with the these tools and they require more frequent cleaning.


The Palm-Style Inoculator requires two hands to operate.

The Thumb-Style Inoculator requires only one hand to operate.
As cultivators know, inoculation and waxing large numbers of logs is a labor intensive, time consuming process. If there was one tool that would do both of these operations in one pass wouldn't that be the ticket? Well there are actually two! The first one is the Okuda Hand Inoculator. This tool is manually loaded like a regular hand held inoculation tool but by pressing the handle downward, the inoculation site is filled and capped with a foam cap in a single motion. The number of logs inoculated per hour is limited only by how fast the operator can refill the tool. Easy to operate and maintain, this would be a great tool for farms inoculating hundreds to thousands of logs.

The Okuda Hand Inoculator can fill and seal with the twitch of a finger.
The second tool that fills and seals in one pass is Okuda's Pegasus Semi-Automatic Log Inoculation Tool. This air-driven tool delivers spawn and a foam cap as fast as the operator can move the tool down the log. Once mastered, this tool can inoculate and seal 60-70 holes per minute. Yes, at times there can be clogging in the spawn delivery line, but it is easily remedied. The key to smooth operation of this tool is using sawdust spawn that has the right particle size which breaks easily into individual particles. To ensure this, we use a kitchen food processor to process the sawdust into a uniform consistency. For farms doing thousands of logs a season, this tool coupled with a high speed drill, will knock the task down to a manageable size in no time flat. The Pegasus does require a 2 HP or larger air compressor to run the machine efficiently.


The Okuda "Pegasus" is considered semi-automatic (vs. fully automatic)
because you still have to drill holes for the spawn to be injected.
The rest is done with a simple squeeze of the finger!
To seal those sawdust spawn inoculation sites you should consider the Okuda Wax Applicator. The ladle on this tool is a heavy gauge stainless steel so it retains heat extremely well. A single filling will seal about 40 inoculation sites (compared to approximately 6-7 holes with a single dip into the wax pot with a dauber; not to mention the wasted wax dripped from pot to log). The foam applicator is replaceable and the tool comes with 196 foam applicator plugs.

If you'd like to check out a quick video we did featuring log inoculation tools side by side, click here).

 Commonly Asked Questions

A foam cap as a sealant, really? That is the question most often posed to us concerning these tools. One solution to this question is that the Pegasus model is available with a wax option. That is, the spawn is delivered pneumatically, but then the inoculation sites would have to be waxed over using the Okuda Wax Applicator or similar device as a separate operation.

What about organic certification using foam caps? In 2007, when the status of clear cheese wax was under review by the National Organic Program, I asked what we could use as an alternative sealant. Their response was: Styrofoam. I was as shocked as you probably are. We have used Styrofoam caps for decades in our operation and if you come by to visit, you will be hard pressed to find them littering our laying or fruiting yard. We are running trials this winter to see what happens to the caps when they come in contact with either Wine Cap, a Pluerotus species or native organisms that are dwelling in our vermiculture boxes. So far, Wine Cap is doing a dandy job of running over Styrofoam caps incubated indoors in filter patch bags. We will see what is left of them in a few months!

What about the cost of caps verses wax? Foam caps are more cost efficient. For instance, to inoculate and seal 350 logs with foam caps the cost per log would be $0.17. To seal with wax, the cost per log would be $0.31 per log, not including the electricity required to melt the wax and the significantly higher shipping cost for the wax.

Okay, then, are there are any other things I should be aware of? Yes. Research by Okuda indicates faster spawn recovery and spawn run in using foam caps versus wax. We set up a trial to duplicate these results on our farm at the end of February.

Why the 13.5mm drill size? We have found that this increase in drill diameter speeds up spawn run as more wood is exposed to inoculum. Another benefit is that the first flush mushrooms from the inoculation sites are larger than those from smaller diameter inoculation sites.

We will let you know what we have to say about the fully automatic tool later in the month of March. By then, we should also be able to report back on our trial regarding different spawn sealant use, spawn run rates and costs per log.

The bottom line is that we offer a wide selection of tools for a variety of price ranges and workloads. Our locally made inoculation tools are solid, well made and the most economical choice for many growers. The Okuda inoculation tools take it up another notch, are built for a lifetime and run like clockwork. Regardless of your choice, purchase of any of our tools guarantees backup support from us here at F&FP; we will continue to use all of the tools we sell and you can always expect help from us, from proper operation instruction to valuable maintenance tips.


Wednesday, February 4, 2015

Reishi Tincture: A Cure All
by Laura

Aside from being beautiful and entertaining to grow, Reishi has great medicinal benefits.
I suppose our recent craze over Reishi as a medicinal happened by accident. Occasionally,  our Table Top Farms fruit on us before we get a chance to put them in the cooler. This happened recently with a full load (nearly 50 blocks) of Reishi. Before we knew it we were surrounded on all sides by Reishi. What to do with all these mushrooms? Why not do what so many others are doing, and make a tincture!

Reishi is difficult to market in our area, mostly because it is not a culinary edible (it is considered non edible because it is too tough, it is NOT poisonous), and when taken in tea form, can be incredibly bitter. I have tried it among countless other teas and spices, and the bitter always shines through. I found myself struggling to finish even a single cup.

Sometimes referred to as the mushroom of immortality, Reishi is most commonly used as a supplement for boosting the immune system to prevent certain viral infections. It is also being used to help with high blood pressure, heart, lung, liver, and kidney disease, and cancer just to name a few. Further research will show you that it is being used for so many more ailments. If you are interested in the details of Reishi I recommend the book Mushrooms for Health by Greg Marley. 

After doing some research I found that certain medicinal components of Reishi are soluble in water (i.e. by making tea), but other components are only soluble in alcohol (i.e by making a tonic) and the very best form of it would come from a double extraction tincture. With a tincture you get the best of both worlds; a liquid that ends up to be 75% water, 25% alcohol, and contains everything that is good about Reishi. Surprisingly, the tincture seems far less bitter than the tea, and is taken in relatively small doses. Therefore, is far less noticeable when added to you favorite drink (I add it to my morning, midday, and sometimes evening coffee).


Mary Ellen 's obsession with coffee is real, and now includes a splash of Reishi tincture.  
"I know in my heart of hearts that if it were not for coffee I would have to find another reason to jump out of bed in the morning. In all truth I believe that Reishi tonic could be it. 1/2 tsp of this tincture first thing in the morning gives me that slightly caffeinated zing, plus I know it is a zing with benefits! I haven't tried it as a coffee substitute yet, but admit to hoping always to have the privilege of drinking both." -- Mary Ellen (Owner of F&FP)

Back in November, Mary Ellen and I decided to make a tincture and give it to all of the employees as a Christmas gift. Certain employees, and I'm not going to name names (Joe, Jasen, Nick, Lindsey & Natalie) have not been religious in taking their Reishi. They probably will not live as long as team members Mary Ellen, Derek, and myself, but we will always remember them for their hard work and dedication to the job.

Here is the method I used for creating the tincture (several online resources were compared for what I believe to be a great recipe):

First, I chopped up a bunch of Reishi using a coffee grinder. Some of this Reishi was fresh and some was completely dried. It filled a glass gallon jar about 1/3 of the way full. You could use a food processor as well (ours just wasn't doing the trick, it kept getting jammed.). Then, I added two bottles (750ml) of 100 proof vodka. The jar ends up to be a little more than half full. I placed the jar in a cool dark place and let it sit for four weeks, shaking it up every few days. Using cheese cloth I strained out the Reishi and placed it a large stock pot (reserving the alcohol of course). The alcohol is measured and an equal amount of water is added to the stock pot (do not add the alcohol though). This amount of water must be marked somehow. Mine conveniently lined up with the bottom of a screw on the stock pot. I added a few extra cups of water and boiled it down (about an inch below my mark) I did this a total of three times, but the third time I shut off the heat when the water reached my mark. Once it cooled I strained out and discarded the Reishi, added the water to the alcohol, stirred, funneled into 4 ounce dropper bottles, and labeled. Some of the discarded Reishi was added to my worm bins, and the rest went into the outdoor compost pile. If any of you have different methods or advice on how to make a tincture with Reishi I would love to hear about it!

Adding a dose of Reishi tincture to my coffee has become part of my daily routine both at home and on the farm.
I have been taking Reishi everyday since mid-December, mostly because I became extremely sick with Mono while my tincture was brewing. The sickness wiped me out for several weeks, and as a mother of four, this just simply can't happen again! I have managed to avoid becoming sick this entire month despite sickness all around me, even in my own home. I am convinced that Reishi is helping my immune system out tremendously, and honestly, going into this I was doubtful. I am not alone in this Reishi journey, here is what Derek had to say:

Depressed from a Packers loss, no worries, Reishi is here! 
"Reishi is not the best tasting fungi, but using this method for personal consumption allowed me to get a healthy dose every day without even noticing the bitter taste. There are various medicinal benefits of this mushroom including immune boosting properties and in my particular case, coping with depression. Once I got on a regular schedule of consumption I noticed the added energy and awareness boost, and can honestly say that I have avoided many flu and virus strains that have plagued the general public. Keep in mind I didn't even waste my hard earned money getting a flu shot! But above all, I have avoided the serious depression that coincides with Green Bay Packer playoffs losses. I am an avid Packer fan and happen to get emotionally invested in my team. Previous failed attempts to reach the Super Bowl left me bed ridden for days. I did not experience this sort of depression this year and I think it is reasonable to conclude that the Reishi helped me overcome this. Get on a regular schedule of Reishi consumption and find out for yourself!"

Derek and I wrote this testimony separately, neither of us, revealing what the other wrote until the day this blog was compiled. Amazing! I too, declined my annual flu shot in order to test the power of Reishi, one amazing fungus. 
Reishi fruiting on a log in here at the farm. This guy is indoors because Reishi is not a fan of our cold climate.


Thursday, October 23, 2014

Last Sigh of Summer: Shiitake Bacon, Lettuce and Tomato Sandwiches
by Mary Ellen

A new F&FP favorite, the Shiitake BLT!

Northern Wisconsin really didn't have summer this year. Mostly cool, rainy, and plagued with a never-ending, relentless crop of mosquitoes, no one wanted to spend much time outdoors.

Some things on the farm managed to shine through regardless. The blueberry crop was exceptional with all of the rain and cooler temps, producing berries the size of marbles! Our shiitake logs, properly cared for and tended in prior years that were kinder to my gardening self, busted out with succulent and richly flavored shiitake all summer long despite my general neglect to them and everything else garden related. And finally, finally, at the end of September, our June-planted tomatoes in the hoop house started turning red. This year, that first harvest of tomatoes pretty much coincided with the tireless march of Miss Happiness shiitake. Dense, solid and meaty, Miss Happiness has one of the longest fall seasons of all the cold weather strains. And man, does this girl have legs: she started in August and is still pinning at the end of October!

Fresh ingredients are always best.
So, in a last ditch attempt to salvage at least the flavor of summer, I decided to make BLT's. And to further redeem myself, I wasn't going to settle for just ordinary.

I am not a fan of bacon (although I do like Canadian bacon). I mostly detest the white part (its fat and texture) of regular bacon and although I tolerate turkey bacon, I squint while preparing it (to avoid its apparent super processed look and smell). It was time to try experimenting with one of those shiitake bacon recipes I've had stuck to my refrigerator for years now.  

Well, as it turns out, shiitake bacon is delicious. It really does taste just like bacon. Yes, it's putzy, but if you have some thick, solid, log grown shiitake, you can slice it, cure it (marinate) and roast it  in a hot oven. It has a rich and buttery flavor, complete with chewy centers and crispy edges. SB also makes a toothsome and healthy snack, as it stays crisp for several hours after cooling from the oven.  This very well may become my new bacon bit.  And of course, shiitake bacon pairs just as well with scrambled eggs or french toast for any non-BLT fans. (We've also heard that smoked shiitake are incomparable. Let us know if you've tried this!)

Here is the method: You will need about a cup of sliced mushrooms per person and that is a modest amount. You really should double the recipe for snacking. The following recipe produces enough bacon for about 4 SBLT's. Note: Allow at least an hour to prepare these. 

Ingredients:
4 cups sliced shiitake

Marinade:
2 TBSP oil
½ tsp salt
1 ½ tsp liquid smoke
2 tsp toasted sesame oil
1 tsp smoked paprika (optional)
2 tsp maple syrup (optional)

Stem the shiitake and slice it thinly. 1/8th inch or less is preferable for the ultimate crispness.

Slicing your shiitakes thin ensures for some nice crispy "bacon".
To prepare the marinade, stir together all ingredients, and drizzle over the sliced shiitakes. Toss the mushrooms in the marinade until the slices are fairly well coated and let marinate at room temperature for at least 20 minutes or up to an hour. Stirring the mushrooms a time or two during that time helps speed things along. You can also marinate and refrigerate overnight to achieve comparable pork bacon cooking times in the morning.

These fresh shiitake were just covered in marinade.

Preheat the oven to 350 degrees (F) and spread the mushrooms out onto a baking sheet. Use parchment or a silpat for easy work, or grease the sheet first.
Bake 20 minutes, stirring or turning halfway through. If the mushrooms are really wet you may need to drain away the water halfway through.

Increase the heat to 375 degrees (F) and check every 10 minutes or so, more often towards the end. Usually if the bacon is sliced thinly it is done in 10-15 minutes after the oven heat is increased. Remove the mushrooms onto a paper towel and blot. It should be browned and irresistible, but not burned. You might experiment with other seasoning in the marinade or with thicknesses of cut; or grilling marinated whole thin-capped mushrooms.  

The end result will not disappoint!
For inspiration, check out www.olivesfordinner.com, for the original shiitake bacon recipe plus other great vegan mushroom recipe ideas.

Friday, April 11, 2014


Our 2014 Poetry Contest
by Mary Ellen


We want to thank all of you who submitted these wonderful poems. We will be constructing a Poetry category on Mushrooming Together for everyone to read them. Please watch for further posts publishing all the entries.  For now, we’d like to publish the 1st, 2nd and 3rd prize (plus honorable mention) for everyone to enjoy. Congratulations to ALL the Poets!

1st Place - Jennifer L. Knox of Nevada, IA

The Mushroom Burial Suit

Screwed onto a silky stem with one arm
Buried to the elbow in a skirt of breathy gills,
A smooth hill of snow caps trace the nose
(Once sneezing), shoulders (once shuddering)
And paunch (once hanging over a waist band).
Busy bees, spores fly below the eye’s radar
To lay and lay down their carpet—soon, seamless
As a fondant, they’ll break down the splitting
Skin, blood, bones, and acorns sprouting in the now
Vacant mouth, down through a life of frets
And flurry to the ground thriving under.


"The poem was written about the Infinity Burial Project, here: http://infinityburialproject.com/
I know very little about mushrooms, but when I learn something new, it is inevitably the coolest thing I've ever heard."


2nd Place - Amber Veverka of Charlotte, NC

Mushrooms

The Anishinaabeg once called it puhpowee, that force
which stirs in secret, lifting leaf mold,
surprising even the serious oaks,
who wake to find at their feet
these new beings, peopling their forest.
All in the damp dark, they come reaching,
sent
summoned
pushed
drawn
with a power so particular, it earns its own name.


"I am not a poet but I love poetry, and have enjoyed it all my life. And my interest in mushrooms started as a child in Michigan, walking in the woods with my mom or dad. At the time I only knew the names of a few but marveled at all the shapes and sizes - the sticky purple mushrooms, the deadly destroying angels, the smooth shelf fungus, the elusive morels. I'm still an amateur when it comes to wild mushrooms, though I am learning about more of them with the help of a local naturalist. But this year, for the first time, I harvested my very own shiitake from logs innoculated with Field & Forest spawn: A surprise from my own shady backyard!"

3rd Place - Whitney Richardson of Chicago, IL

Untitled

I field my walks at night
Light-headed)

Spores cool my mind
Crawling hills beside me)))
(((Below a wet earth
A soft glow enlivens
My reflection sings a lasso
I drop to my knees)))
Underground rotting wood murky plank
Carries you honey mushroom to my island
I will take you wherever you'd like to go


"I'm an artist with an interest in melody, ecology and environmental awareness. My interest in mushrooms has led me to the brain of the forest and the wetness of the shower and the home of the log, all favorite places. I'm immersed in mycological surroundings on the regular now, a new thing for me."

Honorable Mention - Jared Urchek of Boulder, CO

Contamination:

Contamination
Illicit beings upon
My small creations


"Well, I am a mushroom cultivator, I have a small business in Boulder, CO. I was sitting in my shop, buying some of your products when I noticed the poetry contest. I must have sat and looked around for inspiration, and saw a batch of my mushrooms that got contaminated:) Cest la vie! I didn't get mushrooms out of those blocks, but at least I got a good poem!"

---------------------------------------------------------------------------
 

Growing up in the 60’s meant there was a lot of listening for entertainment. My sister and I would lie on the living room floor next to the record player and listen to Disney soundtrack LPs.  My mom would sing us folk songs with her guitar when we were sick.  My oldest sister would read us “The Highway Man” by Alfred Noyes from our family poetry anthology before bed.  That anthology was so well read it had a broken spine by the time I was of reading age. I made sure that we had a similar book in the house when our own kids were little.

Poetry is something that is enjoyed by all ages. Kids love to read poems and lots of kids like to write it. Poetry is fun but also can be dead serious and desperately sad.  Poetry arrests my consciousness and makes my jaw go slack when I hear Garrison Kiellor reading a daily poem on The Writers Almanac.  It isolates and defines and plays with light and illusion as a photographer might do with a camera.

The idea of bringing mushroom poetry to visitors of Mushrooming Together came when a friend of ours sent an original  poem for me to read aloud when Joe was in the hospital  for a few days.  I read the poem to Joe, to nurses, then to Joe again. I found myself wanting to share “Ode to a Toadstool” with every mushroom cook and dinner guest. I got to wondering how much mushroom related poetry was out there…. after all, it’s hard to find a more mysterious, beautiful, functional and culturally important subject!

 
As it turns out we were thrilled to receive 28 excellent entries for this contest. Blind submissions were judged by Dr. Amy Reddinger, Associate Professor of English at UW-Marinette.  All of the poems were wonderful; we couldn’t believe so many talented writers knew … really knew!…. mushrooms.  The top three submissions are so elegant they need no further introduction from us.  The honorable mention, also awarded by Dr. Reddinger who is NOT a mushroom grower, had us giggling and nodding.


Monday, March 17, 2014


Jon’s Lunch
by Jon
The first thing that I can remember cooking for myself was a packet of ramen noodles. It was easy, quick, and hard to beat for an after school snack. However, as I grew up so too did my taste buds and my appreciation for eating healthy. During this time my once favorite snack became the epitome of what I tried to avoid in my diet; a meal consisting primarily of refined carbohydrates, high sodium, and completely lacking in vegetables. As such I avoided ramen for a long time, that is until I found out that you can make your own ramen that is both nutritious and delicious and is only slightly less convenient then a packet of ramen.
True to my style of cooking I never follow a recipe to make this dish. I just eyeball ingredients and throw them into a small pot of simmering water. The beauty of this dish is that no bowl of ramen is ever the same. Even if you order ramen in a restaurant each chef will prepare the soup differently using different ingredients. Use what you have on hand, have fun, and experiment!

How I Make It

 
When making this dish quickly at work I simply get a pot of simmering water going and then throw in a pinch or two of dried seaweed (any kind will do), and whatever mushrooms we have around. Shiitake mushrooms are traditionally used and for good reason; they rehydrate well, retain a nice consistency when simmered, and add a rich flavor to your soup. Since working at FFP I have also gotten to experiment with a variety of other mushrooms and my personal favorite so far is the Italian Oyster. In a soup this mushroom seems to take on an almost seafood character which works very well with the other ingredients and is particularly appealing to my New England taste buds. Once the seaweed and mushrooms are simmering along for a few minutes I then mix in a small spoonful of red miso, a dash of fish sauce, and a dash of soy sauce. All of these ingredients add great flavor to the soup, but you have to be careful not to overdo it as they are high in sodium and strong flavored. At this point I put in any vegetables that I have handy (I have used anything from Cabbage to Burdock Root, really just throw in anything that you have lying around). At the same time you can also throw in your carbohydrate. I often use soba and/or udon noodles but have also used leftover brown rice in a pinch. If using dry noodles you have to cook these until tender. A few minutes before the noodles are done I often throw in a few cubes of tofu and crack an egg in the pot. The tofu just needs to be in long enough to warm up and I try and cook the egg so that the white is cooked through but the yolk is still runny. Previously cooked and shelled hard boiled eggs also work well.

Friday, February 28, 2014

A New Year: Three New Employees
by Laura


Here at Field & Forest Products each new year brings forth great ideas. Last year we had many including revamping our packing room, designing Field & Forest stickers to include in orders, purchasing a new more energy efficient walk-in cooler, and reconfiguring the employees and their office spaces. The later, seems to have left me all alone (except during the lunch hour when the production workers want to peruse the internet.), but this gives me a great opportunity to contemplate and create epic blogs for all to enjoy. See, we have two main office spaces here, Corporate and the Annex. When walking through the front door of Field & Forest you are immediately entering the Annex. There you will find my smiling face. I do share this space with Jasen so I am not truly alone, but he spends just about all of his time making spawn just to the North of me. If I look to the West I can see into Corporate, which houses all of the other VIPS of F&FP. To the East is the packing room. So why the sudden change up of whom gets what office space? The answer is simple...new employees.
We have a total of three new staffers this year. We were in serious need of help in the packing room as well as the lab. It seems that growing mushrooms is becoming more and more popular, which benefits us, as well as you, and perhaps the rest of the world. As sales increase so do the number of orders we send out each year, and the amount of spawn that must be produced and maintained. Our kind of business requires a great deal of collaboration, teamwork, and good food! With all of that said F&FP is proud to introduce Chance, Derek, and Jon.


Chance

 
I am 17 and live in Marinette, Wisconsin. Currently, I am a junior enrolled in Marinette High School, but go through a schooling program called GPS Education Partners, which offers students the ability to take more of a hands-on approach to education by partnering with area businesses to provide work experience. Prior to working with Field & Forest, I didn't know anything about mushrooms or the business.  Since October, when I first became employed, I've learned how to inoculate logs, grow mushrooms, and now know when mushrooms are ready to harvest and how to pick and grade them for shipping. I've also learned about packing and shipping orders. Overall, working here has taught me how to be a good employee.

Outside of school and work I like playing video games, playing rugby and welding. I'm still undecided about what my goals are for after graduation in the spring of 2015.

Derek


I would best describe myself as an outdoor enthusiast who is an extremely devoted Packer fan. Currently living in Titletown, USA and proud to be a new member of the Field & Forest Products team; I started working for the company in January of 2014 after receiving my Bachelor’s Degree in Biology from the University of Wisconsin Green Bay.
During the week you can find me processing orders and packaging them in a secure and orderly fashion. I also help out with a variety of activities that go along with mushroom production. On the weekends you can find me exploring the Bay and small inland lakes for fish and waterfowl or in the northern woods of Wisconsin hunting deer.

Jon


I have had an interest in mushrooms for about as long as I can remember. Even now one of my favorite activities is hunting for edible mushrooms in the spring and fall. Although I grew up in Vermont my interest in fungi keeps bringing me back to Wisconsin; first as a graduate student in mycology at the University of Wisconsin-La Crosse and now as a production and research mycologist for FFP. I am excited to be working at F&FP in a capacity that will allow me to follow my passion for edible mushrooms and their use in agricultural systems.

Tuesday, February 11, 2014

The New Small Farm: Cultivating Encouragement for the Future 
by Mary Ellen

Polyculture work with Almond portobello and tomatoes‏.

Earlier this month we attended the 15th Annual Michigan Small Farm Conference at the top of the mitten in Traverse City. The day-long event registered a record number of attendees, a thousand or more. It was impossible to miss the prevalence of young farmers in the mix.  You can’t imagine how exciting it is for us “old timers” to see the small farm interest busting out with young, articulate, motivated people who are not only interested in land stewardship, but who are operating CSA’s and Market Gardens; already sharp farm managers. Lucky for cooks, mushrooms are part of the crop mix!

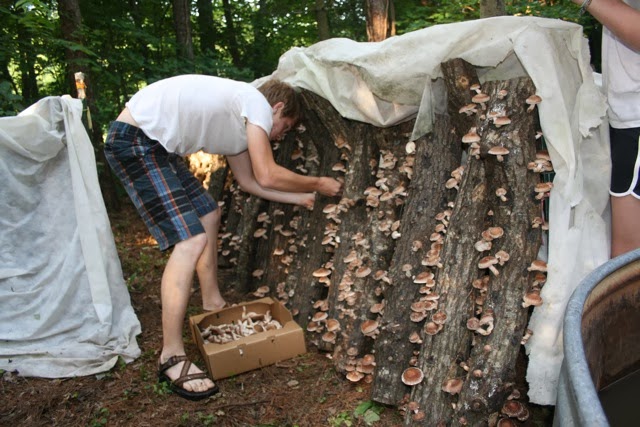
Mushroom grower at Ozark Forest efficiently picking Shiitake with the double handed harvesting method‏.

The Keynote speaker, John Ikerd, Professor emeritus of Agricultural Economics at University of Missouri and a long time observer of farm sustainability, contributed some interesting observations and a convincing pitch for the viability of the small farm. He says, “Small farms of the future will be different from those of the past. They will utilize new knowledge, technologies, and market opportunities to become even better farms than before.”

Encouragingly, the emerging attitude amongst many of these young farmers is that it’s best to be driven by ethics, not economics.  John Ikerd elaborated on this idea. “A real farm is not just an economic enterprise; it is also a way of life and a sacred trust. It’s not just about production and profits; it’s about meeting the real needs of real people, all people, both today and in the future. Real farmers care about their families, they care about the land, they care about their neighbors, they care about their customers, they care about society, and the future of humanity. A new renaissance and reversal of trends is emerging in the search for real food from real farms, and the real farms of the future will be appropriately small.”

The argument is not necessarily about the validity of “large farm” vs. “small farm.” The industrialization of agriculture over the last 50 years has played a large hand in cheaply feeding our growing world and providing us with food choices our grandparents could never have imagined. Though extremely difficult to evaluate, the real cost of degradation to our natural systems and subsequent biological and social effects on human society is increasingly influencing  peoples’ food choices and subsequent growing support of the new small farm.

The way we see it, growing mushrooms is a way of adding value to a farming system that embraces the entire ecological cycle of harvest and decay.  At Field and Forest Products, we are indeed “proud to be part of this rotting world,” and we are also very proud to be part of this exciting shift in agriculture and the people who are driving it.

For the transcript of John Ikerd’s keynote, go to:http://mismallfarmconf.files.wordpress.com/2014/02/john-ikerd-small-farms-are-real-farms.pdf

Tuesday, July 16, 2013


Oyster Mushroom Meets Grill
Written by Mary Ellen
 
Three Oyster Mushroom Wrap with the works!

Here in Northeast Wisconsin a party ain’t a party unless you have “three meats.”  Usually that means pork, chicken and beef (there are no such expectations about any vegetables) so here at F&FP we sure would like to see Oyster mushrooms  take at least one of those spots.  

A no-fuss  ‘Three Oyster Mushroom Wrap” makes a fast and delicious meal. No need to worry about marinades or BBQ sauce, plus how about those vegetarians in the crowd? This wrap will satisfy everyone, even mushroom haters. We guarantee it!  
 
Rachel reveals the three types of Oyster mushrooms (Pink, Golden, and Grey Dove) that will serve as the filling for her birthday party wraps.
All you need is a grill pan (this is one of those pans riddled with holes that will give the food a nice smoky flavor). Ingredients…a mess of Oyster mushrooms and optionally an assortment of chopped vegetables. Use what is lurking in your vegetable crisper if you don’t have an ethnic direction with this dish.  

Method: Get the grill heating. Take your Oyster mushrooms and trim away any straw or bits of wood. From the base of the stem, rip the Oyster mushroom upward until you have a pile of thickly shredded of mushrooms. They cook down fast so you can rip the mushroom into quarters or even leave them whole if they are small.  

Chop a sweet or red onion into chunks. Chop any other vegetables. We like zucchini and sweet peppers. Get a large bowl and toss everything together. Drizzle some vegetable oil on top and toss it all together with your hands until everything is lightly coated with oil. Sprinkle liberally with coarse salt.  

The Oyster mushrooms have been torn into pieces, and the veggies are all cut up, now it's time to grill.

Now have fun with the seasonings!  If you are having a Mexican style wrap, sprinkle with cumin and smoked chipotle chili or smoked paprika. Indian wrap? Cumin and coriander or a zillion other spice combos. New artisanal tortillas inspire a dozen  filling themes, and before you know it you will be adding pineapple, or pears and gorgonzola…maybe even BBQ sauce! Toss until everything is evenly coated. 

Now, slide everything into your grill pan and casually stir fry with a spatula until done (depending if you like crispy or soft) and take advantage of the waning grill heat and warm up your tortillas. Heap on to a serving platter and surround it with condiments: sour cream, cheese, lettuce, salsa, chutney; whatever you have on hand that fits the theme.  

This dish takes less than 30 minutes to assemble from kitchen to table (not including heating up grill; if you live in Northeast Wisconsin sometimes that means heating it with firewood). It is really and truly one of our favorite summer dishes.  If you try it, let us know if you have a favorite flavor combo. Thanks!

Wednesday, March 20, 2013

The Italian Love Affair
Written by Mary Ellen


The Italian Oyster is a delight in both the kitchen and the grow room.

What is the big whoop about Italy and food? Forget the Gelato. The whoop is really all about the Italian Oyster Mushroom. Forget also that the name probably has nothing to do with Italy (besides the name). This is a big complex of Oyster mushrooms with a very wide geographical range. What we do know is that they are a wonderful species of Pleurotus; they are beautiful, tender, creamy brown and white, succulent and the closest culinary match to the glorious King Oyster, and they are a lot easier to grow. Known to mycologists as Pleurotus pulmonarius, the Italian Oyster (Indian Oyster, Chocolate Oyster or Phoenix Oyster, etc.) may have lots of variations within its group, but all share some characteristics that are important to both cultivators and cooks.

In my case, I have been grateful for the forgiving nature of the Italian Oyster, which we grow indoors on pasteurized straw, all winter long. This species seems less sensitive to the effects of light on fruitbody formation, and at the 45th parallel, although we need supplemental light, we don’t always arrange for it. Perhaps it is just not as noticeable because of the shape: short thick stem and spatula or lung shaped caps (hence the species name pulmonarius)* and much less inclined to become overly cupped, clustered and long stemmed as the Tree Oyster group. While it is considered a warm weather Oyster (compared to the P. ostreatus group such as Grey Dove, Blue Dolphin and Polar White strains), it also handles a 58 degree (F) fruiting room just fine.


Italian Oyster fruiting from a straw bag in the grow room at F&FP.

While first crops of the Italian are robust and large capped, subsequent flushes are smaller and can be harvested very young as “Petite Italiana.” A handful of these sweet Petites are tender, juicy and pure delight to use in the kitchen. Even a small grow room can house a few bags of these Oysters, which will produce many months worth of special meals.

One of my favorite ways to use these mushrooms is to braise them; split each in half or in quarters and then caramelize one side in butter, letting them braise in the released juices with a dash of fresh lemon juice or white wine. I treated myself to such a dish the other day in celebration of more snow and the promise of a long, slow spring, nourishment for our thirsty soil following last year's drought. 

Braised Petite Italiana with Snow Peas


Braised Petite Italiana with Snow Peas sets the mood for spring.
 
 
Ingredients:
1 pkg. snow peas, rinsed and unstrung (6 oz.)

4 oz. small Italian Oysters, including stems, split in half (start the split from cap side)
2 tsp. butter
1 T. fresh Lemon juice
Salt and freshly ground pepper
1 tsp. oil

In a medium saucepan, heat 2 tsp butter and add torn caps, Let the pan side caps sizzle for about 2 minutes until they become caramely brown. Sprinkle liberally with coarse salt and fresh pepper, stir and put the lid on. A minute or so later, add 1 T of lemon juice, replace lid and cook until tender. 

Remove the mushrooms and set aside. Add 1 tsp oil and add the snow peas, stir frying briefly until tender. Plate the peas and top with a liberal scoop of mushrooms. Happy Spring!


*Kuo, M. (2009, April). Pleurotus pulmonarius: The summer oyster. Retrieved from the MushroomExpert.Com website: http://www.mushroomexpert.com/pleurotus_pulmonarius.html

Wednesday, February 20, 2013


Shipping Charges Explained...
...Well, Kind of
Written by Joe

This young man might like to know the reasons behind shipping costs.

One of the most commonly asked questions by our customers is “why are shipping rates so high?” This often happens right after the first of each new year. I’ll try my best to explain shipping charges in this post.
All of our spawn products are heavy, wet, and wood or grain based. We also ship wax, another dense heavy object. As you may already know, shipping this kind of product can be expensive.
Field and Forest Products is marking its 30th year in business, and for each of these years there has been an average price increase of 5% by our major carrier, UPS. While 5% may not seem like much, one has to bear in mind that the key word here is “average.” In general, lightweight packages weighing less than 30 lbs. saw an increase of 7.5%, whereas packages weighing upwards of 75 lbs. saw a price increase of only 1.69%! On top of the overall price increase, package surcharge fees also went up. For instance, delivery to a residential address (this includes all you farmers out there) adds another $2.80 to the standard delivery charge. Add to that an extended delivery surcharge to certain zip codes and the surcharge jumps to $3.30.
When placing an order, one thing to remember is that “bundling” of spawn orders reduces the cost per bag to ship. For instance, shipping one 5.5 lb. unit of sawdust spawn to a zone 5 residential address would cost $15.28. Adding an additional 5.5 lb. unit would only add an additional $1.19 to the shipping charge, thus bringing down the cost per unit to ship. The bottom line: try to get all your spawn ordered and shipped in one box (or maximize each box for larger orders requiring multiple boxes) if possible. How much spawn will fit in a UPS box? As a general rule, a UPS box can hold up to: 8 large bags of sawdust spawn; 12 large bags of grain spawn; 12 large bags of plug spawn; or 15 sheets of thimble spawn. The only bundling we cannot offer is that of seasonal spawn ordered out of season. This would include Almond Agaricus, Pink Oyster, Morel, and Portabella or White Button box kits.
On the upside, UPS guarantees time in transit and their software allows us to send our customers an email notification when their order ships, providing them with accessible tracking information. Field and Forest Products also has negotiated rates with UPS. We pass the discounted price on to our customers. For orders weighing over 200 lbs., we are a UPS tier 1 shipper, qualifying our large shipments for the largest discount UPS allows, which is about 10% over our negotiated rates.
What is Field and Forest Products doing to keep shipping costs to a minimum?

In order to keep shipping charges to a minimum for our customers, we seek out alternative carriers for customer shipments and use them whenever possible, passing along the savings. When placing an order online it appears as if UPS is the only shipping option, BUT this is not always the case! Due to the variety of shipping options available to us, we manually calculate shipping charges on all online and phone orders to determine the best shipping option available so that we may provide our customers with the best rate and delivery time possible. Savings, when using an alternate carrier, are directly reflected on your invoice. With the myriad of shipping options available to us, it would be difficult to program our website to accurately calculate which combination of items would fit in a particularly box size, etc., and then select the best possible option. Placing all of those options on our website would most likely confuse our customers as well. This “customized” approach is somewhat unique in the mail order world, as it takes extra resources in staff and packaging supplies, but it makes us feel good to try to reduce shipping costs to our customers whenever possible.
Jeni packing an order into one of our USPS priority boxes, an option for smaller orders!
Other Carrier Options

In the Midwest, we are fortunate to have an alternative carrier, Spee-Dee Delivery Service, whose costs to transport packages is around 50% lower than standard ground charges by the two nationwide carriers. We use SpeeDee Delivery Service for package shipments to all addresses in Wisconsin, Illinois, Minnesota, Iowa, North Dakota, South Dakota, eastern Nebraska and zip code areas 630, 631 and 633 in Missouri. The only downside to using Spee-Dee Delivery Service is that their software is unable to send email notifications to our customers to let them know that their package has been shipped.
Nationwide (including HI and AK), we ship orders of single large units of spawn and multiples of smaller unit sizes, as well as small tool and supply orders via the US Postal Service. The Postal Service in recent years has introduced additional packaging options with very competitive rates of flat rate and regional boxes, perfect for small businesses like ours. The downside to using the US Postal Service is that package delivery times are not guaranteed and there is no real-time tracking. We have noticed over the years, however, that the US Postal Service has upped its level of service and packages are more often than not delivered in 2-3 working days.

What you can do to help keep your shipping costs to a minimum:
•Order online or call for a shipping price quote, rather than placing an order by mail
•Bundle orders to ship all at once (or in quantities that will maximize the space in each box for larger orders when possible).
•Order over 200 lbs. of spawn and supplies :)
•Call to see if we can deliver your order to various conferences (posted on our website) that we attend. Please note that this option is “first come, first serve” based on vehicle space! 

If you would like a quote on shipping costs, we are always happy to accommodate your request. Please let us know if we can be of assistance. We can be reached at 1-800-792-6220 or via email, fieldandforest@centurytel.net